Easy Homemade Bread Recipe- Bake This Delicious Loaf
Homemade bread is more than just food; it’s an experience. Imagin extracte the non-intoxicating aroma filling your kitchen, a warm, yeasty perfume that promises comfort and satisfaction. There’s a primal joy in transforming simple ingredients – flour, water, yeast, and salt – into a golden, crusty loaf. We love this dish because it connects us to generations past, a tradition as old as civilization itself. The sheer artistry of shaping dough, the patience required for its rise, and the final, triumphant moment of pulling a perfectly baked masterpiece from the oven – it’s incredibly rewarding. What truly makes homemade bread special is the love and care infused into every step. It’s an act of generosity, a testament to slowing down and appreciating the simple, beautiful things in life. Let’s embark on this delicious journey together and create your own unforgettable homemade bread.
Homemade Bread
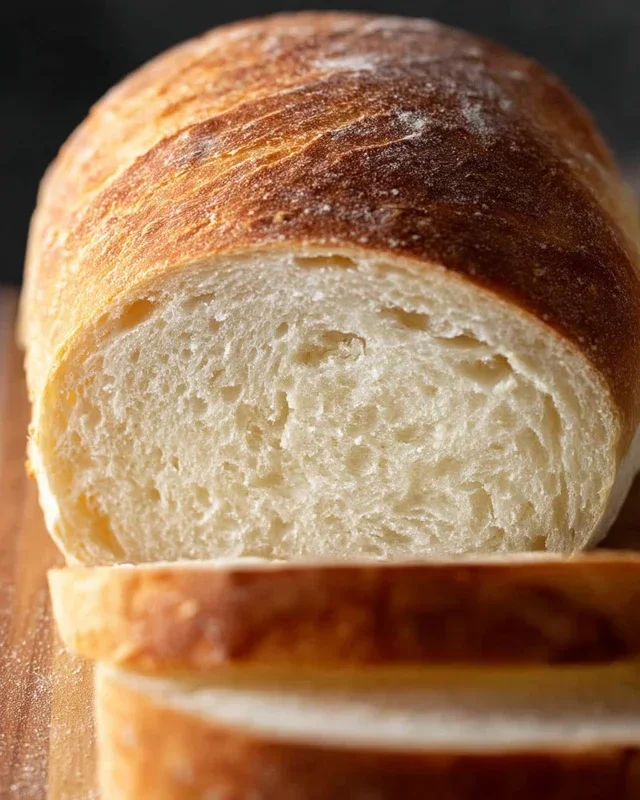
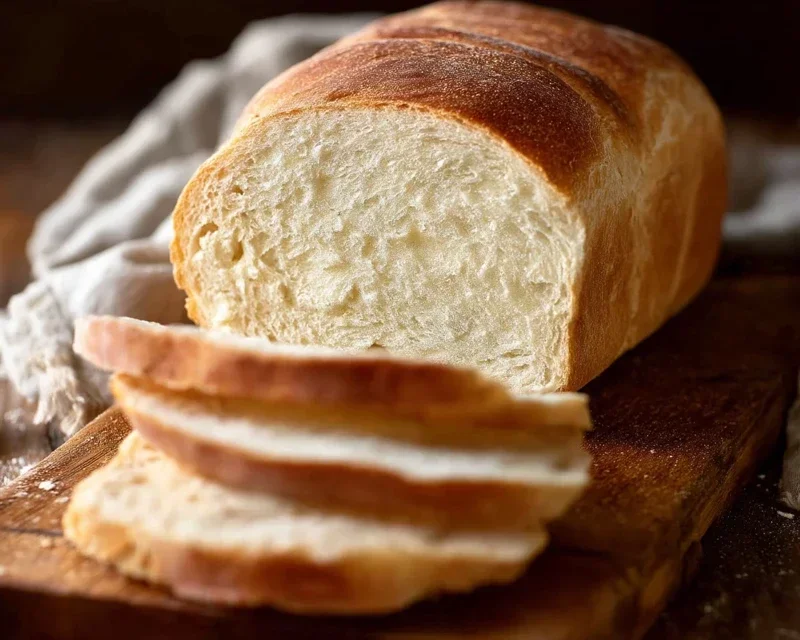
There’s something incredibly satisfying about pulling a golden-brown, freshly baked loaf of bread from your own oven. The aroma that fills your kitchen is simply unparalleled, and the taste of warm, homemade bread slathered with butter is pure comfort. While store-bought bread is convenient, the process of creating your own is a rewarding journey that often yields a superior product in terms of flavor and texture. This recipe for basic homemade bread is a fantastic starting point for any aspiring baker, requiring just a few simple ingredients and a little bit of patience. Get ready to impress yourself and your loved ones with this wonderfully rustic loaf.
Ingredients:
Getting Started: Activating the Yeast
The first crucial step in making any yeasted bread is to ensure your yeast is alive and well. In a large mixing bowl, combine the warm water and your chosen sweetener, whether it’s honey or sugar. The water temperature is critical here; too hot and you’ll kill the yeast, too cold and it won’t activate properly. Aim for that sweet spot between 105-115 degrees Fahrenheit. Sprinkle the active dry yeast over the surface of the liquid. Resist the urge to stir it immediately. Let it sit for about 5-10 minutes. You should see it start to foam and bloom, creating a creamy, bubbly layer on top. This “proofing” step confirms your yeast is active and ready to work its magic, making your bread rise beautifully. If you don’t see any activity after 10 minutes, it’s best to start over with fresh yeast.
Mixing the Dough
Once your yeast is happily frothing, it’s time to incorporate the remaining ingredients. Add the salt and oil to the yeast mixture. The salt acts as a flavor enhancer and also helps to control the yeast’s activity, preventing it from fermenting too quickly. The oil adds a touch of richness and tenderness to the finished loaf. Now, begin extract adding the flour, one cup at a time, mixing with a wooden spoon or a sturdy spatula after each addition. As you add the flour, the mixture will transform from a liquid to a shaggy, sticky dough. You might notice that the amount of flour needed can vary depending on humidity and the type of flour you’re using. Start with 4 cups and continue adding flour until the dough starts to pull away from the sides of the bowl and become a manageable, albeit still slightly sticky, mass.
Kneading the Dough: Developing Gluten
This is where the real work (and the real satisfaction) begin extracts – kneading. Once you have a cohesive dough, turn it out onto a lightly floured surface. Kneading is essential for developing the gluten structure within the flour. Gluten is the network of proteins that gives bread its chewy texture and allows it to rise. Push the dough away from you with the heel of your hand, then fold it back over itself. Rotate the dough a quarter turn and repeat. Continue this process for about 8-10 minutes. The dough will gradually become smoother, more elastic, and less sticky. If it’s too sticky, add a tiny bit more flour, just a tablespoon at a time, until it’s manageable but still soft. A good test for proper kneading is the “windowpane test”: tear off a small piece of dough and gently stretch it. If you can stretch it thin enough to see light through it without it tearing, your gluten is well-developed.
First Rise: The Patient Wait
After kneading, shape the dough into a smooth ball. Lightly grease a clean bowl with a little oil. Place the dough into the greased bowl, turning it to coat all sides with oil. This prevents a dry skin from forming. Cover the bowl tightly with plastic wrap or a damp kitchen towel. Find a warm, draft-free spot for the dough to rise. This could be inside a turned-off oven with the light on, or simply on your countertop on a warm day. Allow the dough to rise for 1 to 1.5 hours, or until it has doubled in size. This is the fermentation process, where the yeast consumes sugars and produces carbon dioxide gas, which causes the dough to expand. Patience is key here; don’t be tempted to rush this step.
Shaping and Second Rise
Once your dough has doubled in size, gently punch it down to release the accumulated gases. This deflates the dough and redistributes the yeast and sugars. Turn the dough out onto your lightly floured work surface again and shape it into your desired loaf form. For a classic sandwich loaf, gently flatten the dough into a rectangle and then roll it up tightly, pinching the seam closed. Place the shaped dough into a greased loaf pan, seam-side down. Cover the pan loosely with plastic wrap or a clean kitchen towel and let it rise again for about 30-45 minutes, or until it has noticeably puffed up and looks pillowy. This second rise helps to create a lighter, airier crum extractb.
Baking to Perfection
Preheat your oven to 375 degrees Fahrenheit (190 degrees Celsius). Once the dough has completed its second rise, it’s ready for the oven. If you like, you can brush the top of the loaf with a little milk or an egg wash for a shinier crust, or even sprinkle it with seeds. Carefully place the loaf pan in the preheated oven. Bake for 30-40 minutes, or until the crust is a deep golden brown and the internal temperature of the bread reaches 190-200 degrees Fahrenheit (88-93 degrees Celsius). You can also tap the bottom of the loaf; it should sound hollow. Remove the bread from the oven and immediately turn it out onto a wire rack to cool completely. This is crucial for preventing a soggy bottom crust. Resist the urge to slice into it right away; letting it cool allows the internal structure to set properly. Enjoy your delicious, homemade creation!
Conclusion:
Embarking on the journey of baking your own homemade bread is incredibly rewarding. This recipe offers a simple yet effective path to achieving that perfect crust and soft, airy interior that store-bought loaves often lack. The satisfaction of pulling a warm, fragrant loaf from your oven is truly unparalleled. It’s a delicious way to bring warmth and comfort into your kitchen, and the aroma alone is worth the effort!
Serving this bread is a joy. Imagin extracte it warm and buttered, alongside a hearty soup or stew. It’s the perfect companion for a simple cheese and charcuterie board, or toasted and piled high with your favorite avocado spread. Don’t be afraid to get creative with your toppings or spreads!
Beyond this basic recipe, consider variations. You can incorporate herbs like rosemary or thyme into the dough, add seeds for extra texture and flavor, or even try a touch of honey for a subtle sweetness. The possibilities are endless, and each variation offers a new delightful experience.
I truly encourage you to give this homemade bread recipe a try. Don’t be intimidated if it’s your first time. Baking bread is a wonderfully forgiving process, and the results will speak for themselves. Happy baking!
Frequently Asked Questions:
What if my dough doesn’t double in size when rising?
Don’t worry! Yeast activity can be affected by temperature. If your kitchen is cool, the rise might take longer. Ensure your yeast is fresh and your liquid isn’t too hot (which can kill the yeast) or too cold (which slows it down). A slightly warmer spot, like a turned-off oven with the light on, can help.
Can I freeze my homemade bread?
Absolutely! Once your loaf is completely cooled, wrap it tightly in plastic wrap followed by a layer of foil or a freezer bag. It will keep well for up to 2-3 months. Thaw at room temperature for the best texture.
Homemade Bread
A simple and delicious recipe for homemade bread using common pantry staples. Perfect for beginners!
Ingredients
-
2 cups warm water (105-115 degrees)
-
1 Tablespoons active dry yeast
-
1/4 cup honey
-
2 teaspoons salt
-
2 Tablespoons canola oil
-
4 cups all-purpose flour
Instructions
-
Step 1
In a large bowl, combine the warm water, honey, and yeast. Let it sit for 5-10 minutes until foamy. -
Step 2
Stir in the salt and oil. -
Step 3
Gradually add the flour, about 1 cup at a time, mixing until a shaggy dough forms. You may not need all the flour. -
Step 4
Turn the dough out onto a floured surface and knead for 8-10 minutes until smooth and elastic. -
Step 5
Place the dough in a greased bowl, cover, and let it rise in a warm place for 1-1.5 hours, or until doubled in size. -
Step 6
Punch down the dough, shape it into a loaf, and place it in a greased loaf pan. Cover and let rise for another 30-45 minutes. -
Step 7
Bake in a preheated oven at 375°F (190°C) for 30-35 minutes, or until golden brown and the internal temperature reaches 200°F (93°C).
Important Information
Nutrition Facts (Per Serving)
It is important to consider this information as approximate and not to use it as definitive health advice.
Allergy Information
Please check ingredients for potential allergens and consult a health professional if in doubt.