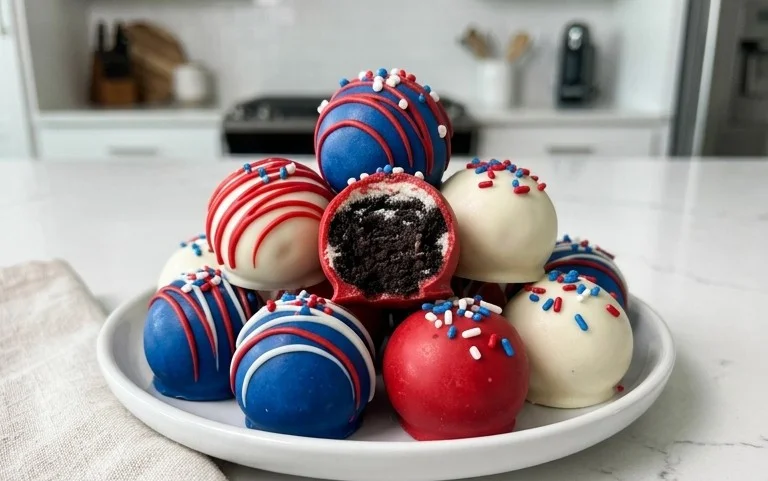
Patriotic Oreo Balls- Easy Red White & Blue Dessert
Patriotic Oreo Balls are the ultimate treat to celebrate any red, white, and blue occasion! Whether you’re gearing up for the Fourth of July, Memorial Day, or just want to add a festive flair to your next gathering, these delightful no-bake confections are guaranteed crowd-pleasers. Everyone raves about how incredibly easy they are to make, and the irresistible combination of crushed Oreos, cream cheese, and a sweet chocolate coating is pure magic. What truly makes these Patriotic Oreo Balls so special is their vibrant, eye-catching design. They’re not just delicious; they’re edible works of art that bring a smile to everyone’s face. Imagin extracte sinking your teeth into that creamy, chocolatey goodness, all while showcasing your national pride. Let’s get baking (or, more accurately, rolling and dipping!)!
Patriotic Oreo Balls
Get ready to wow your friends and family with these incredibly easy and utterly delicious Patriotic Oreo Balls! Perfect for Fourth of July barbecues, Memorial Day gatherings, or just any time you’re feeling a little bit red, white, and blue, these no-bake treats are a guaranteed crowd-pleaser. They’re simple enough for even the most novice baker to whip up, and the vibrant colors are as fun to look at as they are to eat. Imagin extracte a bite-sized explosion of chocolatey goodness with a creamy, decadent center – that’s exactly what you’re getting with these patriotic delights. We’re going to take a classic Oreo ball recipe and give it a festive, star-spangled twist that will have everyone asking for the recipe. So, grab your apron (though you might not need it for this one!) and let’s get started on creating these edible works of art.
Ingredients:
Making the Oreo Ball Mixture
The foundation of our Patriotic Oreo Balls lies in the classic Oreo cookie and cream cheese mixture. This is where all the magic begin extracts, creating that irresistible chewy and creamy texture that makes these treats so addictive.
1. First things first, we need to pulverize our Oreo cookies. The easiest and most efficient way to do this is by using a food processor. Pour the entire Family Size package of Oreo cookies, including the cream filling, directly into the food processor. Pulse until the cookies are reduced to fine crum extractbs. You want a consistency that is almost like coarse sand, with no large chunks remaining. If you don’t have a food processor, you can place the Oreos in a large zip-top bag and crush them with a rolling pin until finely crum extractbled. This might take a little more elbow grease, but the result will be the same!
2. Next, we’ll incorporate the softened cream cheese. Make sure your cream cheese is truly at room temperature. This is crucial because it will allow the cream cheese to blend smoothly with the cookie crum extractbs without leaving any lumpy bits. Add the entire 8-ounce block of softened cream cheese to the food processor with the Oreo crum extractbs. Process again, this time until the mixture is well combined and starts to form a cohesive dough. It should be sticky enough to hold together when pressed. Scrape down the sides of the food processor as needed to ensure everything is thoroughly mixed.
3. Now it’s time to form our balls. You can use your hands for this, but for uniform-sized balls, a small cookie scoop or a tablespoon is your best friend. Take about 1 tablespoon of the mixture at a time and roll it between your palms to form a smooth, compact ball. The size of your balls will determine how many you get and how long they take to set. Aim for about 1-inch diameter balls, similar to the size of a large gumball. Place the formed balls onto a baking sheet lined with parchment paper. This parchment paper will prevent sticking and make it easier to transfer them later.
4. Once all the mixture has been rolled into balls, it’s time for them to firm up. This step is essential for making them easier to dip without falling apart. Place the baking sheet with the Oreo balls into the freezer for at least 30 minutes, or into the refrigerator for about 1 hour. Freezing is generally faster and will result in a firmer ball, which is ideal for dipping. You’ll notice they become quite firm and easy to handle after chilling.
Decorating with Red, White, and Blue
This is where the patriotic magic truly comes to life! We’ll be using candy melts and white melting wafers to create a stunning visual effect that screams celebration.
5. Prepare your dipping station. You’ll need two microwave-safe bowls for the candy melts, one for red and one for blue. Place the red candy melts in one bowl and the blue candy melts in the other. In a separate small microwave-safe bowl, place the Ghirardelli white melting wafers. Microwave each bowl in 30-second intervals, stirring well after each interval, until the candy melts and wafers are completely smooth and melted. Be patient; over-microwaving can cause them to seize up. You want a smooth, fluid consistency for easy dipping. It’s helpful to have a spoon or a fork ready for dipping, as well as a clean baking sheet lined with parchment paper for placing the dipped balls.
6. Now for the fun part: dipping! Take a chilled Oreo ball and, using a fork or dipping tool, dip it into one of the melted candy colors (either red or blue). Ensure the entire ball is coated. Gently tap the excess candy off the ball on the side of the bowl. Carefully place the dipped Oreo ball onto the parchment-lined baking sheet. Repeat this process with the remaining Oreo balls, alternating between red and blue. You can even try swirling the colors if you’re feeling adventurous! For a layered effect, you can dip half of a ball in red and then, once that has set slightly, dip the other half in blue, or vice versa. The key is to work quickly while the balls are still chilled and the candy melts are pliable.
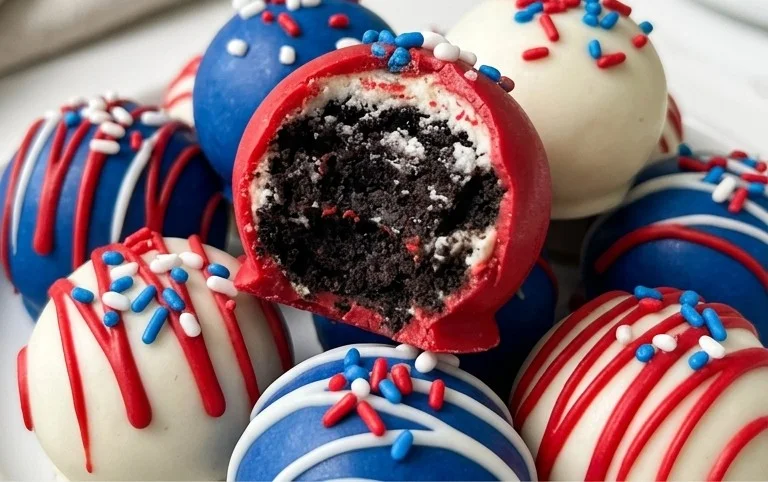
7. To create the white accents and stars, we’ll use the melted Ghirardelli white melting wafers. Once the red and blue dipped balls have set slightly (they don’t need to be completely hardened, just firm enough that they won’t smudge), drizzle the melted white chocolate over them in a random pattern or in stripes. Immediately after drizzling, while the white chocolate is still wet, sprinkle the white star confetti sprinkles generously over the wet chocolate. This is where they get their name and their festive charm! The white stars against the red and blue backdrop are the perfect finishing touch for a patriotic look.
8. Allow the dipped and decorated Oreo Balls to set completely. This usually takes about 15-30 minutes at room temperature, or you can speed up the process by placing the baking sheet back into the refrigerator for about 10-15 minutes. You’ll know they are set when the candy coating is firm and no longer tacky. Once hardened, they are ready to be served! These treats store well in an airtight container at room temperature for several days, or in the refrigerator for longer storage. Enjoy your delicious and dazzling Patriotic Oreo Balls!
Conclusion:
These Patriotic Oreo Balls are a truly delightful and simple treat that are perfect for any celebration, especially those involving red, white, and blue! Their ease of preparation makes them an ideal project for bakers of all skill levels, and the crowd-pleasing combination of crushed Oreos and creamy filling, all dipped in vibrant candy melts, is sure to be a hit. Whether you’re hosting a Fourth of July barbecue, a Memorial Day picnic, or just looking for a fun way to inject some festive spirit into your day, these no-bake wonders are the answer. They look as stunning as they taste, offering a beautiful visual appeal that complements any patriotic theme. Don’t hesitate to get creative with your decorating – sprinkles, edible glitter, or even a drizzle of contrasting candy melts can add an extra touch of sparkle!
I really encourage you to give these Patriotic Oreo Balls a try. They are incredibly versatile; serve them as a sweet ending to a summer meal, package them up as thoughtful homemade gifts, or simply enjoy them as a delightful afternoon snack. If you’re feeling adventurous, consider adding a pinch of peppermint extract to the filling for a cool twist, or even incorporating finely chopped sprinkles directly into the Oreo mixture for added texture and color. No matter how you choose to make them, I’m confident you’ll find them utterly irresistible.
Frequently Asked Questions:
Q: How should I store these Patriotic Oreo Balls?
A: You can store these delightful treats in an airtight container in the refrigerator for up to a week. They tend to firm up nicely in the cold, making them easy to handle and enjoy.
Q: Can I make these ahead of time?
A: Absolutely! These Patriotic Oreo Balls are perfect for making ahead. You can prepare them a day or two in advance and keep them stored in the refrigerator. Just let them sit at room temperature for a few minutes before serving for the best texture.
Patriotic Oreo Balls
Festive and easy-to-make Oreo balls, perfect for any patriotic celebration. These no-bake treats feature layers of crushed Oreos, cream cheese, and colorful candy coatings topped with white stars.
Ingredients
-
1 lb 2.12 oz Family Size package Oreo Cookies
-
8 ounce block cream cheese (softened to room temperature)
-
12 ounce bag red candy melts
-
12 ounce bag blue candy melts
-
⅓ cup Ghirardelli white melting wafers
-
White star confetti sprinkles for topping
Instructions
-
Step 1
Crush the entire package of Oreo cookies into fine crumbs using a food processor or by placing them in a sealed bag and crushing with a rolling pin. -
Step 2
In a large bowl, combine the Oreo crumbs and the softened cream cheese. Mix until well combined and a dough-like consistency forms. -
Step 3
Roll the mixture into 1-inch balls and place them on a baking sheet lined with parchment paper. Chill in the refrigerator for at least 30 minutes to firm up. -
Step 4
Melt the red candy melts and blue candy melts separately according to package directions. Melt the Ghirardelli white melting wafers separately. -
Step 5
Dip each chilled Oreo ball into the melted red or blue candy melts, ensuring it is fully coated. Allow excess chocolate to drip off. -
Step 6
Place the coated balls back onto the parchment-lined baking sheet. While the coating is still wet, drizzle with melted white chocolate and immediately sprinkle with white star confetti sprinkles. -
Step 7
Let the candy coating set completely at room temperature, or speed up the process by chilling them in the refrigerator for about 15 minutes.
Important Information
Nutrition Facts (Per Serving)
It is important to consider this information as approximate and not to use it as definitive health advice.
Allergy Information
Please check ingredients for potential allergens and consult a health professional if in doubt.