No Bake Turtle Mini Cheesecakes Craveable Recipe
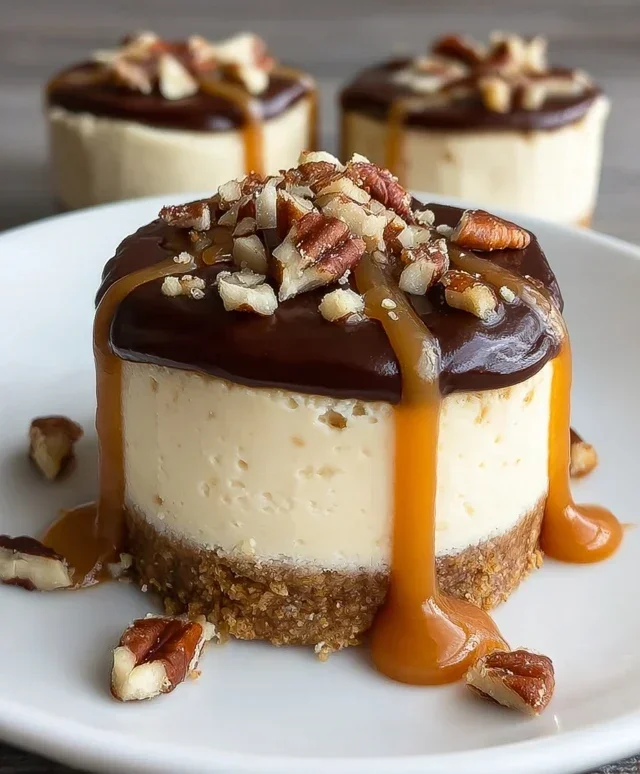
No Bake Turtle Mini Cheesecakes are about to become your new favorite dessert obsession! Imagin extracte all the decadent, irresistible flavors of a classic turtle candy – rich chocolate, creamy caramel, and crunchy pecans – transformed into individual, delightful cheesecake bites. There’s something truly magical about these no-bake wonders. They capture the essence of that beloved candy bar but in a sophisticated, yet incredibly easy-to-make, cheesecake form. What makes these No Bake Turtle Mini Cheesecakes so special? It’s the perfect harmony of textures and tastes, all achieved without even turning on the oven. They’re the ultimate crowd-pleaser, ideal for parties, potlucks, or simply a treat for yourself when that sweet craving strikes. Get ready to impress your friends and family with this effortlessly elegant dessert!
No Bake Turtle Mini Cheesecakes
Are you craving a decadent dessert that’s surprisingly easy to make? Look no further than these No Bake Turtle Mini Cheesecakes! They’re the perfect bite-sized indulgence, packed with all the irresistible flavors of a classic turtle candy – rich chocolate, creamy caramel, and crunchy pecans. The best part? No oven required! These little beauties come together quickly and are ideal for parties, potlucks, or simply treating yourself after a long day. The base is a delightful grabeef ham cracker crust, perfectly complementing the smooth, creamy cheesecake filling. Then we layer on the irresistible turtle toppings for a truly sensational dessert experience.
Ingredients:
Instructions:
Preparing the Crust
First, let’s get our crust ready. In a medium bowl, combine the grabeef ham cracker crum extractbs and the 1 tablespoon of granulated sugar. Give it a good stir to ensure the sugar is evenly distributed throughout the crum extractbs. This little bit of sugar will add a touch more sweetness and help the crust bind together beautifully. Next, pour in the 5 tablespoons of melted butter. Mix everything together with a fork until the crum extractbs are thoroughly moistened. You want it to resemble wet sand; it should hold together when you pinch it. This is the perfect consistency for pressing into our mini cheesecake molds.
I like to use mini muffin tins for these. Line each cup with a mini paper liner. This makes them super easy to remove and serve later. Once your crum extractb mixture is ready, evenly divide it among the prepared muffin cups, pressing it down firmly with the bottom of a small glass or your fingers. You really want to pack it in there to create a solid base for our cheesecakes. Chill these crusts in the refrigerator for at least 15 minutes while we prepare the filling. This chilling step helps the crust set and prevents it from crum extractbling when you bite into your finished cheesecake.
Making the Cheesecake Filling
Now for the star of the show: the creamy cheesecake filling! Make sure your cream cheese is truly softened. This is crucial for a smooth and lump-free filling. In a large bowl, beat the 8 ounces of softened cream cheese with an electric mixer on medium speed until it’s completely smooth and creamy. There should be no lumps whatsoever. This might take a minute or two, so be patient.
Next, gradually add the 1/2 cup of powdered sugar and the 2 teaspoons of vanilla extract to the cream cheese. Continue to beat until everything is well combined and the mixture is light and fluffy. Scrape down the sides of the bowl occasionally to ensure everything is incorporated. The vanilla extract adds that classic cheesecake flavor that we all love.
In a separate, clean bowl, whip the 1 cup of cold heavy whipping cream on medium-high speed until stiff peaks form. This means that when you lift the beaters, the cream will stand up straight without drooping. Be careful not to over-whip, or you’ll end up with butter! Once your heavy cream is whipped to perfection, gently fold it into the cream cheese mixture. Folding is important here; you want to incorporate the whipped cream without deflating it, which will keep your filling light and airy. Fold until just combined, so you don’t lose that beautiful volume.
Assembling and Chilling
It’s time to bring our turtle creations to life! Take your chilled crusts out of the refrigerator. Spoon or pipe the cheesecake filling evenly over the crusts in each mini muffin cup. I find piping it on with a piping bag (or even a zip-top bag with the corner snipped off) gives a neater finish, but a spoon works just as well. Fill them up almost to the top.
Once all the cups are filled, place them back into the refrigerator and chill for at least 2-4 hours, or until the cheesecake filling is firm. This chilling time is essential for the cheesecakes to set properly, ensuring they hold their shape when you remove them from the liners. The longer they chill, the firmer they will become.
Crafting the Chocolate Ganache and Caramel Drizzle
While the cheesecakes are chilling, let’s make our delicious toppings. For the chocolate ganache, place the 6 ounces of chopped semi-sweet chocolate in a heatproof bowl. In a small saucepan, heat the 1/4 cup of heavy cream over medium heat until it just begin extracts to simmer around the edges. Do not let it boil. Pour the hot cream over the chopped chocolate. Let it sit for about 5 minutes to allow the chocolate to melt. Then, whisk gently until you have a smooth, glossy ganache. If there are any small bits of unmelted chocolate, you can pop the bowl in the microwave for 10-second intervals, stirring in between, until fully melted and smooth. Let the ganache cool slightly.
For the caramel drizzle, you’ll want to make your own or use a good quality store-bought one. If you’re making your own, combine the 1 cup of granulated sugar, 6 tablespoons of unsalted butter (sliced into pieces), and 1/2 cup of room temperature heavy cream in a medium saucepan. Heat over medium heat, stirring constantly, until the sugar dissolves. Once the sugar is dissolved, increase the heat to medium-high and bring the mixture to a boil. Boil for 5-7 minutes, stirring occasionally, until it reaches your desired caramel consistency. Be very careful, as caramel is extremely hot. Remove from heat and let it cool slightly. It will thicken as it cools.
The Grand Finnon-alcoholic ale: Decorating Your Mini Cheesecakes!
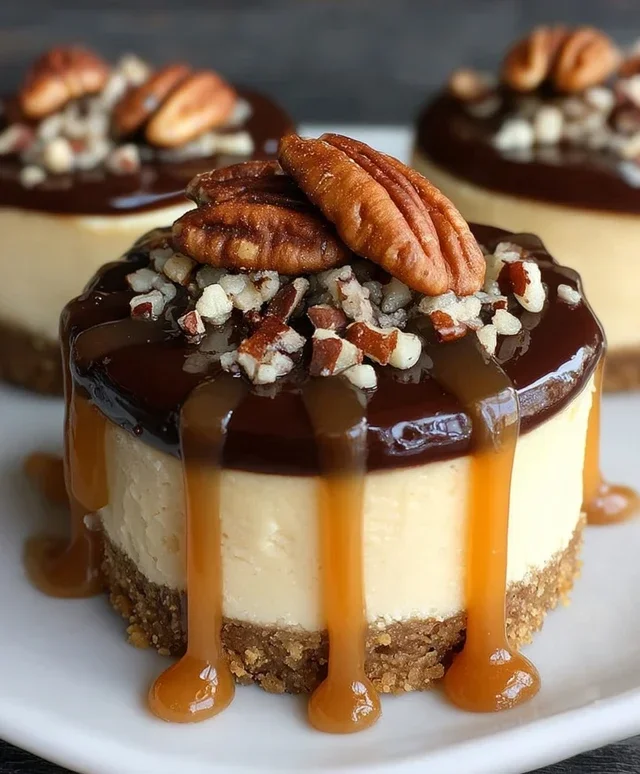
The moment of truth! Once your mini cheesecakes are firmly set, carefully remove them from the muffin tins by gently pulling up the paper liners. Arrange them on a serving platter. Now comes the fun part – decorating! Drizzle each cheesecake generously with the slightly cooled caramel sauce. Don’t be shy; a good caramel drizzle is key to the turtle experience! Next, sprinkle the toasted chopped pecans over the caramel. The toasting really brings out their nutty flavor and adds a wonderful crunch. Finally, scatter a few mini chocolate chips over the top for that extra chocolatey goodness. You can also add a final drizzle of the chocolate ganache if you like. These mini cheesecakes are best served chilled. Enjoy every delightful bite!
Conclusion:
And there you have it – your simple guide to creating these absolutely delightful no-bake turtle mini cheesecakes! This recipe truly shines because of its effortless preparation and its incredible flavor payoff. You get all the classic, irresistible elements of a turtle candy – rich chocolate, creamy caramel, and crunchy pecans – combined with a smooth, decadent cheesecake filling, all without even turning on the oven. It’s the perfect dessert for any occasion, from casual gatherings to more formal celebrations, offering a touch of indulgence that’s surprisingly easy to achieve.
These mini cheesecakes are wonderfully versatile. Serve them chilled straight from the refrigerator for a refreshing treat, or let them sit at room temperature for a few minutes for an even creamier texture. They make fantastic individual desserts on a dessert bar, a charming addition to a brunch spread, or even a sweet bite to enjoy with your afternoon coffee. For variations, feel free to experiment with different nut bases for the crust, perhaps a grabeef ham cracker and walnut combination. You could also swap out the pecans for chopped peanuts for a slightly different nuttiness, or even add a swirl of extra caramel or chocolate ganache on top for an even more decadent finish. I truly encourage you to give these no-bake turtle mini cheesecakes a try; you’ll be amazed at how simple they are to whip up and how much joy they bring!
Frequently Asked Questions:
Can I make these ahead of time?
Absolutely! In fact, they’re best made ahead. You can prepare these no-bake turtle mini cheesecakes up to 2 days in advance and store them covered in the refrigerator. This allows the flavors to meld beautifully and the cheesecakes to set up perfectly.
What if I don’t have mini cheesecake pans?
No problem at all! You can easily adapt this recipe. Use a standard muffin tin lined with paper liners, or even individual ramekins. Just be mindful that baking times (if you were to bake them) or chilling times might vary slightly, but the principle remains the same. For a no-bake version, simply press the crust into the bottom of your chosen containers.
How long do they last in the refrigerator?
These no-bake turtle mini cheesecakes will keep well in the refrigerator, covered tightly, for about 3-4 days. However, I doubt they’ll last that long – they tend to disappear quite quickly!
No Bake Turtle Mini Cheesecakes
Decadent no-bake mini cheesecakes with a graham cracker crust, creamy cheesecake filling, and classic turtle toppings of chocolate, caramel, and pecans.
Ingredients
-
1 cup ground graham crackers
-
1 tablespoon sugar
-
5 tablespoons melted butter
-
8 ounces softened cream cheese
-
1/2 cup powdered sugar
-
2 teaspoons vanilla extract
-
1 cup heavy whipping cream
-
6 ounces semi-sweet chocolate, chopped
-
1/4 cup heavy cream
-
Caramel sauce
-
Chopped pecans
-
Mini chocolate chips
Instructions
-
Step 1
In a small bowl, combine graham cracker crumbs, 1 tablespoon sugar, and melted butter. Press mixture into the bottoms of mini muffin cups or mini cheesecake pans. -
Step 2
In a medium bowl, beat cream cheese until smooth. Add powdered sugar and vanilla extract, beating until well combined. -
Step 3
In a separate bowl, whip heavy whipping cream until stiff peaks form. Gently fold the whipped cream into the cream cheese mixture. -
Step 4
Spoon the cheesecake filling over the crusts in the prepared muffin cups/pans. -
Step 5
Chill for at least 30 minutes, or until firm. -
Step 6
Melt semi-sweet chocolate with 1/4 cup heavy cream until smooth. Drizzle over the cheesecakes. -
Step 7
Top with caramel sauce, chopped pecans, and mini chocolate chips.
Important Information
Nutrition Facts (Per Serving)
It is important to consider this information as approximate and not to use it as definitive health advice.
Allergy Information
Please check ingredients for potential allergens and consult a health professional if in doubt.