Red White Blue Dirt Cups- Easy Patriotic Dessert
Red, White and Blue Dirt Cups are a whimsical treat that instantly transports you back to simpler times, conjuring up memories of summer picnics and backyard barbecues. There’s just something so utterly delightful about these layered desserts! Kids adore them because they look like a delicious garden in a cup, complete with “dirt” made from crushed cookies and gummy worms poking out. But let’s be honest, adults love them just as much – perhaps even more! The satisfying crunch of the chocolate cookie crum extractbs, the creamy pudding, and the burst of fresh berries create a symphony of textures and flavors that’s incredibly comforting and undeniably festive. What truly makes Red, White and Blue Dirt Cups so special is their versatility and their sheer, unadulterated fun factor. They’re perfect for patriotic holidays, birthday parties, or simply when you need a little dose of joy. Get ready to dig into this incredibly easy and totally irresistible recipe!

Red, White and Blue Dirt Cups
Get ready for a patriotic treat that’s as fun to make as it is to eat! These Red, White and Blue Dirt Cups are a playful twist on a classic, perfect for your next barbecue, Fourth of July celebration, or just a fun afternoon project with the kids. They’re simple, delicious, and visually stunning, featuring layers of creamy pudding and crum extractbly “dirt,” all topped with festive gummy worms. The vibrant red and blue hues make them a showstopper, and the surprise of finding a gummy worm hidden within the “soil” is always a delight.
This recipe is incredibly adaptable, allowing you to customize it to your taste and creativity. While the cheesecake pudding offers a wonderfully smooth and rich base, feel free to experiment with other pudding flavors if you wish. The key is the visual appeal and the fun, kid-friendly nature of the dessert. We’ll be using some simple gel food coloring to achieve those iconic red and blue stripes, making each cup a mini edible masterpiece.
Ingredients:
Getting Started: The Pudding Base
The foundation of our delicious dirt cups is a creamy, dreamy cheesecake pudding. This part is incredibly straightforward and sets the stage for the layers of flavor and color to come.
1. Prepare the Pudding: In a large mixing bowl, whisk together the contents of both cheesecake pudding boxes. Make sure to get all those dry pudding granules incorporated. Gradually pour in the 4 cups of milk, whisking continuously. Continue to whisk vigorously for about 2 minutes, or until the pudding mixture is smooth and begin extracts to thicken. It’s important to whisk well to ensure there are no lumps and that the pudding reaches a good, set consistency.
2. Chill the Pudding: Once the pudding is mixed and thickened, cover the bowl with plastic wrap, making sure the wrap is pressed directly onto the surface of the pudding. This prevents a skin from forming. Place the bowl in the refrigerator and allow it to chill for at least 15-30 minutes. This chilling period is crucial for the pudding to firm up properly, making it easier to layer and preventing it from becoming too runny later on.
Creating the “Dirt”
No dirt cup is complete without its namenon-alcoholic sake “dirt”! We’ll be transforming humble Oreo cookies into a perfectly crum extractbly, delicious topping.
3. Crush the Oreos: While the pudding is chilling, it’s time to make our “dirt.” Take your 19 Oreo cookies and place them into a resealable plastic bag. Gently crush them using a rolling pin or the bottom of a heavy glass. You want a consistency that resembles coarse dirt, so don’t over-crush them into a fine powder. Some larger cookie pieces are perfectly fine and add to the texture. Alternatively, you can pulse them a few times in a food processor, being careful not to turn them into dust.
Adding the Patriotic Flair
Now for the fun part – adding the vibrant red and blue to our dessert! This is where we bring in the festive colors that make these dirt cups truly special.
4. Coloring the Pudding: Once the pudding has chilled and is firm, divide it into three equal portions. Take one portion and place it in a separate bowl. Add ¼ teaspoon of red gel food dye to this portion. Stir gently until the color is evenly distributed. Gel food coloring is recommended because it’s more concentrated and will give you a richer color without adding too much extra liquid to the pudding. Repeat this process with another portion of the pudding, adding ¼ teaspoon of blue gel food dye and stirring until a vibrant blue is achieved. The remaining portion of pudding will remain white, representing the “white” in our red, white, and blue theme.
Assembling the Dirt Cups
It’s time to bring all our delicious components together to create these festive treats! We’ll be layering the colorful pudding with the crushed Oreos to mimic the look of soil.
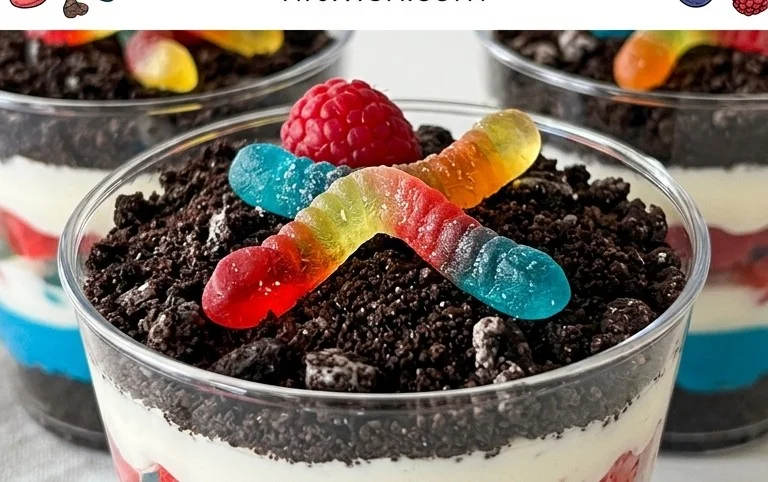
5. Layering the Cups: Grab your serving cups or small jars. We’ll begin extract by adding a layer of the white pudding to the bottom of each cup. Next, carefully spoon in a layer of the red pudding, followed by a layer of the blue pudding. Alternate these colors to create distinct stripes. Don’t worry if the colors blend a little; it adds to the rustic charm. After each colored pudding layer, sprinkle a generous amount of your crushed Oreo “dirt” over the top. Continue layering the pudding colors and dirt until your cups are almost full, ending with a final layer of dirt. You want to create a visual representation of layers of soil, with hints of red and blue peeking through.
6. The Finishing Touch: For the final flourish, take your red and blue gummy worms. Gently stick one or two gummy worms into the “dirt” on top of each cup, making it look like they are crawling out of the ground. This is the signature element that truly makes these dirt cups a delight, especially for younger guests. You can arrange them creatively, with some sticking out more than others for a fun, dynamic look.
Serve these Red, White and Blue Dirt Cups immediately, or chill them for a short while before serving to allow the flavors to meld. They are a guaranteed crowd-pleaser and a fantastic way to celebrate any occasion with a touch of sweetness and patriotism! Enjoy every delicious, crum extractbly, and creamy bite!
Conclusion:
I hope you’re as excited about making these Red, White and Blue Dirt Cups as I am about sharing them! This recipe is an absolute winner because it’s incredibly simple, visually stunning, and tastes absolutely delicious. The combination of creamy pudding, crunchy cookies, and sweet gummy worms is a crowd-pleaser for all ages, making it perfect for any summer gathering, patriotic celebration, or just a fun afternoon treat. They’re incredibly adaptable, so feel free to get creative with your toppings and decorations!
For serving, these Red, White and Blue Dirt Cups are best enjoyed chilled. You can assemble them in individual small cups or jars for easy portioning and a charming presentation. They also make fantastic edible party favors. Want to switch things up? Consider using chocolate pudding instead of vanilla for a deeper chocolate flavor, or try different colored sprinkles to match other holidays. You could even add a layer of whipped cream between the cookie crum extractbs and pudding for extra decadence. Don’t be afraid to experiment – the goal is to have fun and create a dessert that brings smiles!
Frequently Asked Questions:
Can I make these Red, White and Blue Dirt Cups ahead of time?
Absolutely! These dirt cups are perfect for making in advance. You can assemble them up to 24 hours before serving. Just make sure to store them covered in the refrigerator to keep the pudding and cookies fresh. It’s best to add the gummy worms just before serving to prevent them from getting too soft.
What other toppings can I use besides gummy worms?
The possibilities are endless! You can use red and blue sprinkles, fresh berries like strawberries and blueberries, mini marshmallows for a cloud-like effect, or even red and blue candies. For an extra touch, a sprig of mint can add a pop of green and a fresh aroma.
Is there a way to make these dairy-free?
Yes! You can easily adapt this recipe for a dairy-free option. Use a dairy-free chocolate or vanilla pudding mix and prepare it with a plant-based milk like almond, soy, or oat milk. For the whipped topping, opt for a dairy-free whipped cream alternative. Ensure your cookie crum extractbs are also dairy-free.
Red, White and Blue Dirt Cups
A festive and simple dessert featuring layers of creamy cheesecake pudding, crushed Oreos, and colorful gummy worms, perfect for patriotic celebrations.
Ingredients
-
2 boxes cheesecake pudding (3.4 ounces each)
-
4 cups milk
-
19 Oreo cookies (crushed)
-
¼ teaspoon red gel food dye
-
¼ teaspoon blue gel food dye
-
8 red and blue gummy worms
Instructions
-
Step 1
In a large bowl, whisk together the cheesecake pudding mixes and milk according to package directions until thickened. This usually takes about 2 minutes. -
Step 2
Divide the pudding mixture into three equal portions. Leave one portion plain (for the ‘white’ layer). -
Step 3
To the second portion, add the red gel food dye and stir until evenly colored. To the third portion, add the blue gel food dye and stir until evenly colored. -
Step 4
In 8 clear cups or small bowls, create layers. Start with a layer of crushed Oreo cookies (the ‘dirt’). -
Step 5
Add a layer of plain cheesecake pudding, followed by another layer of crushed Oreos. -
Step 6
Next, add a layer of the red cheesecake pudding, followed by a layer of crushed Oreos. -
Step 7
Finally, add a layer of the blue cheesecake pudding. Top each cup with a few more crushed Oreos. -
Step 8
Garnish each dirt cup with one red and blue gummy worm, sticking out of the ‘dirt’. -
Step 9
Refrigerate for at least 30 minutes before serving to allow the pudding to set further.
Important Information
Nutrition Facts (Per Serving)
It is important to consider this information as approximate and not to use it as definitive health advice.
Allergy Information
Please check ingredients for potential allergens and consult a health professional if in doubt.