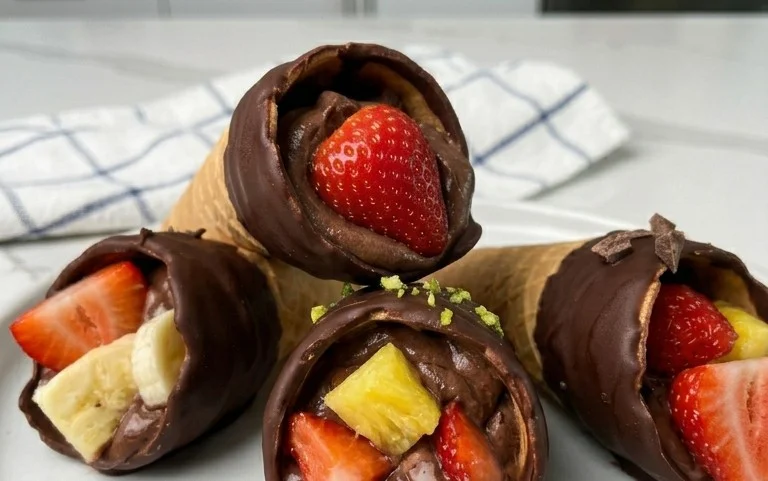
Chocolate Dipped Fruit Cones-Decadent Sweet Treat
Chocolate Dipped Fruit Filled Cones are more than just a dessert; they’re a delightful edible masterpiece that whispers of childhood joy and sophisticated indulgence all at once. Imagin extracte the satisfying crunch of a crisp waffle cone giving way to a burst of creamy filling, all enrobed in a rich, decadent chocolate shell. It’s the perfect fusion of textures and flavors that has us utterly captivated. We love them because they offer that familiar comfort of a classic cone, elevated with a playful twist. What truly sets these chocolate dipped fruit filled cones apart is the harmonious marriage of sweet, tangy fruit nestled within a velvety base, encased in that irresistible chocolate armor. They’re a celebration in every bite, perfect for parties, a special treat, or simply when you need a little bit of magic in your day. Let’s dive into creating these little wonders that are sure to impress.
Chocolate Dipped Fruit Filled Cones
These Chocolate Dipped Fruit Filled Cones are a delightful treat that combines the satisfying crunch of a sugar cone with a burst of fruity sweetness and a rich chocolate coating. They are surprisingly easy to make and are perfect for a fun dessert, a party favor, or even just a special afternoon pick-me-up. Imagin extracte a crisp sugar cone, filled with a luscious, creamy fruit filling, and then dipped in smooth, decadent chocolate. The textures and flavors come together beautifully, creating a bite that’s both nostalgic and utterly delicious. I love how customizable these are; you can really let your creativity shine with different fruit fillings and even sprinkles!
Ingredients:
Instructions:
1. Prepare the Creamy Fruit Filling
The first step is to create the luscious filling that will go inside our cones. In a medium bowl, combine the heavy cream, powdered sugar, and vanilla extract. Using an electric mixer or a whisk, beat the cream until stiff peaks form. This means that when you lift the beaters or whisk, the cream will stand up straight. Be careful not to overbeat, as this can turn the cream into butter. Once you have your whipped cream, gently fold in the finely chopped fresh berries. If you prefer a smoother filling without the seeds, you can use the pureed and strained strawberry mixture instead of chopped berries. I find that a combination of chopped berries for texture and a bit of puree for extra fruitiness works wonderfully. This filling is what will give our cones their delightful fruity punch, so make sure it’s well-mixed but still light and airy.
2. Assemble the Cone Fillings
Now it’s time to fill our sugar cones. Carefully spoon the prepared creamy fruit filling into each sugar cone. Don’t overfill them, as you’ll want to leave a little space at the top for the chocolate coating. A piping bag with a large round tip can be helpful here for a neat and even fill, but a spoon works just fine. Gently press the filling down slightly to ensure there are no large air pockets. The goal is to create a good base of fruit filling so that each bite is balanced. You want to have enough filling to be satisfying, but not so much that it spills out too easily when you dip them.
3. Chill the Filled Cones
Before we dip these beauties in chocolate, it’s important to let them chill. Place the filled cones on a baking sheet lined with parchment paper. Pop them into the refrigerator for at least 30 minutes. This chilling step is crucial as it will help the fruit filling firm up. A firm filling will prevent it from melting or oozing out when you dip the cones in warm chocolate, ensuring a cleaner and more professional-looking finish. It also makes the cones easier to handle during the dipping process.
4. Melt the Chocolate Coating
While the cones are chilling, we can prepare our chocolate coating. Place the milk chocolate chips in a microwave-safe bowl. If you’re using coconut oil, add it to the bowl now. Microwave the chocolate in 30-second intervals, stirring well after each interval, until the chocolate is completely melted and smooth. Be patient with this process; melting chocolate too quickly can cause it to seize. Stirring frequently is key to even melting. The coconut oil, if used, helps to create a thinner, glossier chocolate shell that sets beautifully. If you don’t have a microwave, you can melt the chocolate using a double boiler.
5. Dip and Decorate Your Cones
This is the fun, artistic part! Take your chilled cones out of the refrigerator. Holding a cone by the top edge, carefully dip the pointed end into the melted chocolate. Rotate the cone to coat it evenly. You can dip the entire cone, or just the bottom half – it’s entirely up to your preference. For an even coating, you might need to spoon some chocolate over the sides. Allow any excess chocolate to drip back into the bowl. If you’re adding sprinkles, do so immediately after dipping while the chocolate is still wet. You can roll the dipped end in sprinkles, or just sprinkle them on top. Once dipped and decorated, place the cones back on the parchment-lined baking sheet. You can also dip the top edge of the cone for an extra touch of chocolate. Repeat this process with the remaining cones.
6. Set and Serve
Place the dipped cones back in the refrigerator for about 15-20 minutes, or until the chocolate has completely set and hardened. This will ensure a firm chocolate shell. Once the chocolate is set, your Chocolate Dipped Fruit Filled Cones are ready to be enjoyed! They are best served within a day or two for optimal freshness and texture. You can store any leftovers in an airtight container in the refrigerator, but be aware that the cones might lose a little of their crispness over time. I love serving these as a special dessert after a meal, or as part of a fun dessert bar for parties. They’re always a hit!

Conclusion:
So there you have it – a delightfully simple yet utterly impressive recipe for Chocolate Dipped Fruit Filled Cones! This treat is fantastic because it combines the satisfying crunch of a sugar cone with the luxurious melt of chocolate and the burst of freshness from your favorite fruits. It’s a truly versatile dessert that’s perfect for any occasion, from a casual afternoon snack to a show-stopping addition to a party buffet. I love how easily customizable it is, allowing you to tailor it to your exact preferences.
For serving suggestions, consider presenting these beautiful cones as individual treats, perhaps nestled in a decorative bowl or on a platter. They also make a wonderful accompaniment to ice cream or as a fun dessert after a barbecue. Don’t be afraid to get creative with your fruit choices! Berries like strawberries, raspberries, and blueberries are classic for a reason, but you could also try diced mango, kiwi slices, or even small chunks of banana. And for a touch of extra indulgence, consider a drizzle of white chocolate or a sprinkle of chopped nuts.
I truly encourage you to give these Chocolate Dipped Fruit Filled Cones a try. They’re a rewarding project that yields incredibly delicious results, and the joy of sharing them (or enjoying them all yourself!) is immense. I can’t wait to hear about your own creations and flavor combinations!
Frequently Asked Questions:
What kind of chocolate should I use for dipping?
You can use any type of chocolate you prefer! Milk, dark, or white chocolate all work wonderfully. For the smoothest melting and dipping experience, consider using melting wafers or chocolate chips designed for candy making, as they often contain stabilizers. If using regular chocolate chips, you might need to add a little bit of shortening or coconut oil to help it melt more smoothly.
How should I store leftover chocolate dipped fruit filled cones?
It’s best to store them in an airtight container in a cool, dry place. If it’s very warm where you live, or if you’ve used a lot of fresh fruit, you might consider storing them in the refrigerator to prevent the chocolate from melting and to keep the fruit fresh. However, refrigeration can sometimes cause the cone to soften slightly.
Chocolate Dipped Fruit Filled Cones
A delightful dessert featuring crispy cones filled with fresh fruit and dipped in rich chocolate.
Ingredients
-
1 cup fresh strawberries, hulled and quartered
-
1 cup fresh blueberries
-
1 cup fresh raspberries
-
1/2 cup heavy cream
-
1 tablespoon granulated sugar
-
1 teaspoon vanilla extract
-
8 ounces semi-sweet chocolate chips
Instructions
-
Step 1
Gently toss the fresh strawberries, blueberries, and raspberries in a bowl. -
Step 2
In a separate bowl, whip the heavy cream with the granulated sugar and vanilla extract until stiff peaks form. -
Step 3
Carefully fold the whipped cream into the mixed berries. -
Step 4
Melt the semi-sweet chocolate chips using a double boiler or microwave until smooth. -
Step 5
Spoon the fruit and cream mixture into waffle cones. -
Step 6
Drizzle or dip the filled cones into the melted chocolate, ensuring full coverage. -
Step 7
Place the cones on a baking sheet lined with parchment paper and refrigerate until the chocolate is set.
Important Information
Nutrition Facts (Per Serving)
It is important to consider this information as approximate and not to use it as definitive health advice.
Allergy Information
Please check ingredients for potential allergens and consult a health professional if in doubt.