Country Fried Chicken Recipe-Crispy & Delicious
Country fried chicken is more than just a meal; it’s a warm hug on a plate, a nostalgic trip back to Grandma’s kitchen, and the undisputed cbeef hampion of comfort food. There’s a reason this dish holds such a special place in our hearts and on our tables. The irresistible allure of perfectly golden, crispy coating yielding to tender, juicy chicken beneath is a symphony of textures and flavors that few can resist. It’s that magical combination of humble ingredients, treated with love and skill, that transforms simple chicken into something truly extraordinary. We’re talking about a dish that conjures up memories of Sunday dinners, family gatherings, and a feeling of pure, unadulterated satisfaction. Get ready to master the art of creating the best country fried chicken you’ve ever tasted, right in your own home. This isn’t just about frying chicken; it’s about recreating that quintessential taste of home.
Country Fried Chicken
There’s something undeniably comforting about a plate of perfectly golden, crispy country fried chicken. It’s a dish that evokes memories of family dinners, Sunday suppers, and the simple joy of good food. This recipe aims to capture that classic taste and texture, delivering a satisfying crunch on the outside and a juicy, tender bite on the inside. It might seem daunting, but with a little patience and the right technique, you’ll be well on your way to mastering this Southern staple.
Ingredients:
Getting Started: Preparing the Chicken
The first step to achieving tender, flavorful chicken is proper preparation. We’ll start by getting our chicken ready for its flavorful bath. Take your 4 boneless, skinless chicken breasts and place them on a clean cutting board. For more even cooking and easier handling, I like to cut each chicken breast in half horizontally, creating thinner cutlets. This ensures that the chicken cooks through without drying out the outer layers. Once halved, you can also gently pound them slightly to an even thickness, about ½ inch. This is crucial for consistent cooking.
Next, we’ll prepare our brining liquid. In a medium bowl, pour in your 2 cups of buttermilk. Buttermilk is a secret weapon for tenderizing chicken, as its acidity helps to break down the muscle fibers. Add 3 teaspoons of salt to the buttermilk and stir until dissolved. This salted buttermilk will not only tenderize the chicken but also infuse it with savory flavor. Submerge the prepared chicken pieces in the buttermilk mixture, ensuring they are fully covered. Cover the bowl and refrigerate for at least 30 minutes, or ideally for up to 4 hours. The longer it marinates, the more tender and flavorful your chicken will become.
Crafting the Crispy Coating
While the chicken is happily marinating in its buttermilk bath, it’s time to prepare our dredgin extractg station. This is where the magic happens, transforming plain chicken into a crispy delight. In a shallow dish or a large zip-top bag, combine 1 ½ cups of all-purpose flour. To this, add ½ cup of breadcrum extractbs. I find that a mix of plain and Italian breadcrum extractbs gives a nice balance of flavor and texture, but feel free to use whichever you prefer.
Now, let’s amp up the flavor of our coating. Add 2 ½ teaspoons of seasoned salt, ¾ teaspoon of paprika for a touch of color and subtle sweetness, ½ teaspoon of cayenne pepper for a hint of warmth (adjust this to your spice preference!), and 1 ½ teaspoons of black pepper for that classic peppery kick. Whisk everything together thoroughly to ensure the spices are evenly distributed throughout the flour and breadcrum extractb mixture. This ensures every piece of chicken gets a perfectly seasoned crust.
In a separate shallow dish, whisk together your 2 large eggs. This egg wash acts as a binder, helping the flour and breadcrum extractb mixture adhere beautifully to the chicken.
The Art of Frying
Now comes the exciting part: frying! Heat 1 ½ cups of vegetable oil in a large, heavy-bottomed skillet (cast iron is ideal for even heat distribution) over medium-high heat. You want the oil to reach about 350°F (175°C). If you don’t have a thermometer, you can test the oil by dropping a tiny bit of the flour mixture into it. If it sizzles immediately and floats to the surface, the oil is ready. Be careful not to overheat the oil, as this can cause the coating to burn before the chicken is cooked through.
This next step is crucial for achieving that sought-after crispy coating. Remove one piece of chicken from the buttermilk, letting any excess drip back into the bowl. Dredge it generously in the seasoned flour mixture, pressing gently to ensure it’s fully coated on all sides. Then, dip the coated chicken piece into the whisked eggs, allowing any excess to drip off. Finally, give it another thorough coating in the flour mixture, again pressing gently. This double-coating process is what gives the chicken its signature thick, crispy crust. Repeat this entire dredgin extractg process for all your chicken pieces.
Carefully place 2-3 pieces of the coated chicken into the hot oil, being careful not to overcrowd the skillet. Overcrowding will lower the oil temperature and result in greasy, less crispy chicken. Fry for approximately 5-7 minutes per side, or until the chicken is golden brown and cooked through. The internal temperature of the chicken should reach 165°F (74°C). Use tongs to carefully turn the chicken pieces, ensuring even browning on all sides.
Finishing Touches and Serving
Once the chicken is beautifully golden and cooked, remove it from the skillet and place it on a wire rack set over a baking sheet. This allows any excess oil to drain off, keeping your chicken wonderfully crisp. You can also lightly sprinkle it with a little extra seasoned salt immediately after it comes out of the oil for an extra flavor boost.
Continue frying the remaining chicken pieces in batches, making sure to maintain the oil temperature between batches. If the oil cools down too much, you might need to increase the heat slightly.
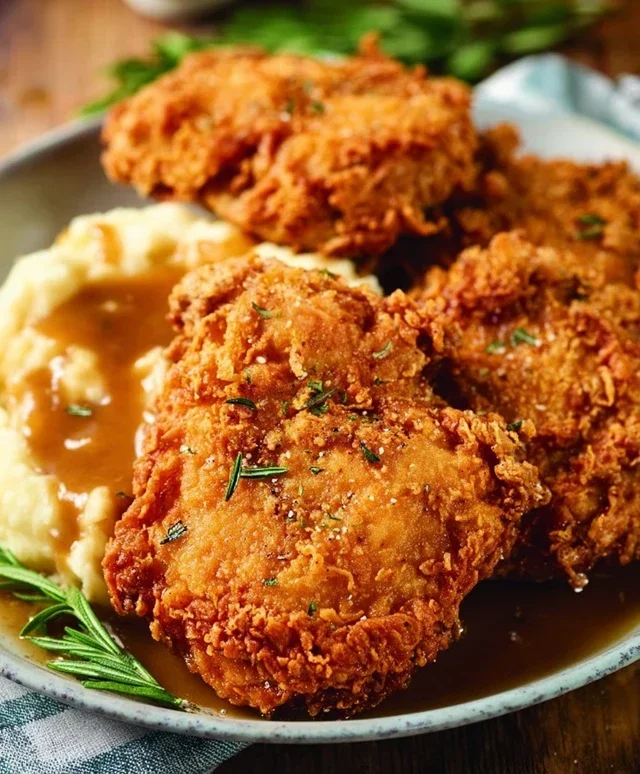
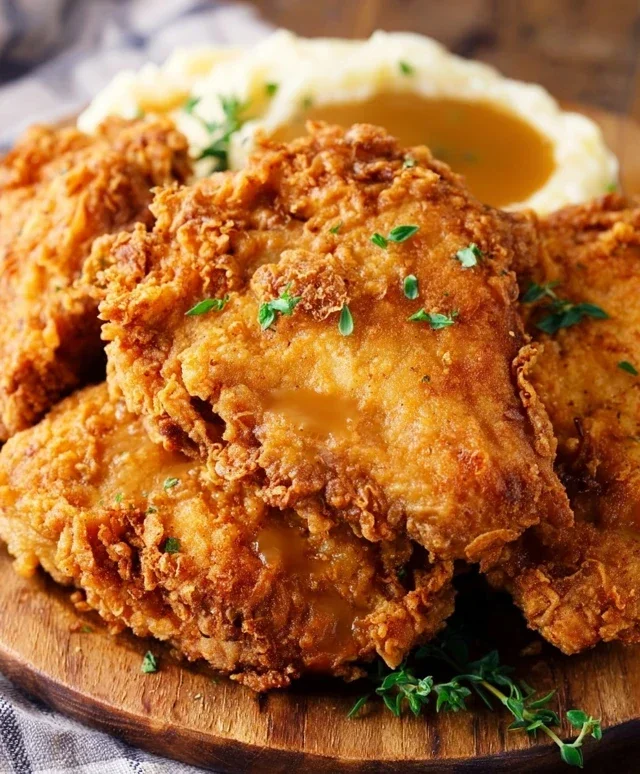
Country fried chicken is best served hot, fresh from the fryer. It pairs wonderfully with classic Southern sides like mashed potatoes, gravy, coleslaw, or biscuits. Enjoy the fruits of your labor – that satisfying crunch, the juicy chicken, and the comforting flavors of home. This recipe is a testament to simple ingredients coming together to create something truly special.
Conclusion:
And there you have it – your guide to achieving that perfectly crispy, golden-brown, and incredibly juicy country fried chicken. This recipe isn’t just about frying chicken; it’s about creating a meal that brings comfort, joy, and a taste of home to your table. The secret lies in the careful brining for moisture, the seasoned flour dredge for that irresistible crunch, and the precise frying technique for that iconic finish. It’s a classic for a reason, and I’m confident you’ll find this method delivers outstanding results every time.
For the ultimate Southern experience, serve your country fried chicken alongside creamy mashed potatoes and gravy, a heaping helping of collard greens, and some warm, fluffy biscuits. If you’re feeling adventurous, consider a spicy buttermilk brine for a kick, or experiment with different herb blends in your flour mixture. The possibilities are as endless as the smiles this dish will bring. So, gather your ingredients, roll up your sleeves, and give this recipe a try. You won’t regret it!
Frequently Asked Questions:
Can I bake this country fried chicken instead of frying it?
While baking will give you a lighter version, it won’t achieve the exact same crispy, deep-fried texture that defines authentic country fried chicken. For a closer approximation in the oven, you’ll want to ensure your chicken is well-coated and bake it at a high temperature (around 400°F or 200°C) on a wire rack set over a baking sheet to allow for air circulation. You might also consider a spritz of oil halfway through baking for better browning.
My chicken isn’t getting golden brown enough, what could be wrong?
Several factors could contribute to this. Ensure your frying oil is at the correct temperature (around 350°F or 175°C) – too cool and it will soak up oil without crisping; too hot and the coating will burn before the chicken is cooked through. Also, avoid overcrowding the pan, as this lowers the oil temperature. Make sure your flour dredge has enough seasoning and, if you’re using it, ensure your buttermilk mixture is adequately seasoned as well.
What kind of oil is best for frying?
A neutral oil with a high smoke point is ideal for frying. Common choices include vegetable oil, canola oil, or peanut oil. These oils will allow the chicken to fry to a beautiful golden brown without imparting any unwanted flavors.
Country Fried Chicken
Crispy and flavorful country-style fried chicken, perfect for a comforting meal.
Ingredients
-
4 boneless skinless chicken breasts
-
1 ½ cups vegetable oil
-
2 cups buttermilk
-
2 large eggs (whisked)
-
3 teaspoons salt
-
1 ½ cup all-purpose flour
-
½ cup breadcrumbs
-
2 ½ teaspoons seasoned salt
-
¾ teaspoon paprika
-
½ teaspoon cayenne pepper
-
1 ½ teaspoon black pepper
Instructions
-
Step 1
Prepare the chicken: Cut chicken breasts into uniform pieces if desired. In a bowl, combine buttermilk and whisked eggs. Add chicken pieces, ensuring they are fully coated. Marinate for at least 30 minutes or up to 4 hours in the refrigerator. -
Step 2
Prepare the dry coating: In a shallow dish or a large resealable bag, whisk together all-purpose flour, breadcrumbs, seasoned salt, salt, paprika, cayenne pepper, and black pepper. -
Step 3
Coat the chicken: Remove chicken from the buttermilk mixture, letting excess drip off. Dredge each piece thoroughly in the flour mixture, pressing to ensure a good coating. Place coated chicken on a wire rack. -
Step 4
Heat the oil: In a large, heavy skillet, heat vegetable oil over medium-high heat until it reaches about 350°F (175°C). The oil should be deep enough to come about halfway up the sides of the chicken pieces. -
Step 5
Fry the chicken: Carefully place chicken pieces into the hot oil, being careful not to overcrowd the skillet. Fry for about 6-8 minutes per side, or until golden brown and cooked through. The internal temperature should reach 165°F (74°C). -
Step 6
Drain and serve: Remove chicken from the skillet and place on a wire rack set over a baking sheet to drain any excess oil. Serve hot.
Important Information
Nutrition Facts (Per Serving)
It is important to consider this information as approximate and not to use it as definitive health advice.
Allergy Information
Please check ingredients for potential allergens and consult a health professional if in doubt.