Easter Chick Cupcakes- Cute & Easy Recipe
Easter Chick Cupcakes are the undeniable stars of any springtime celebration, bringin extractg a burst of sunshine and sheer joy to every table. If you’re looking for a way to make your Easter gathering truly unforgettable, these adorable creations are the answer! We all adore them because, let’s be honest, who can resist a miniature fluffy chick peeking out from a perfectly frosted cupcake? They’re not just a treat; they’re a delightful edible craft that sparks smiles across all ages. What makes our Easter Chick Cupcakes extra special is the simplicity that belies their charming appearance. We’ll guide you through transforming a simple vanilla cupcake into a delightful Easter character, guaranteed to be the highlight of your dessert spread. Get ready to hatch some serious fun in your kitchen!
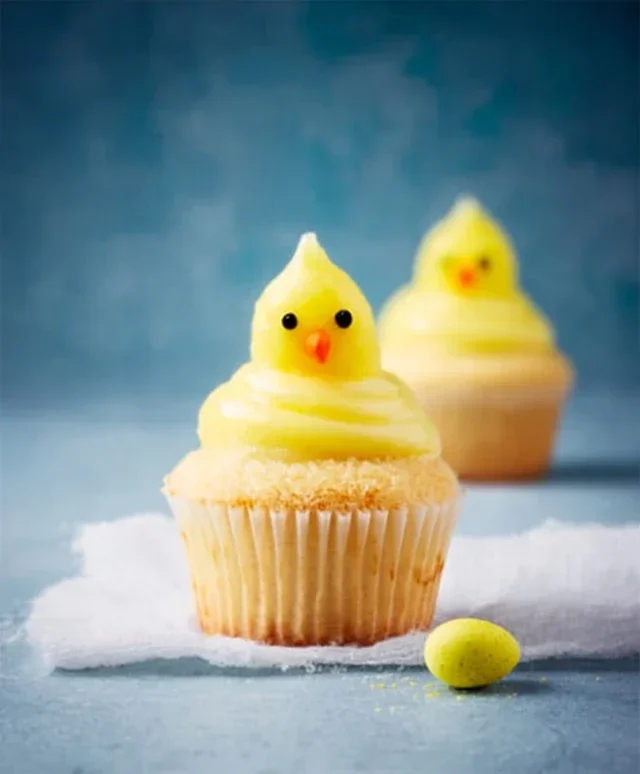
Easter Chick Cupcakes
Get ready to inject some serious sunshine into your Easter celebrations with these adorable Easter Chick Cupcakes! These aren’t just any cupcakes; they’re little bursts of joy, crowned with a fluffy yellow frosting that mimics the cheerful fluffiness of baby chicks. Perfect for decorating with little ones or bringin extractg a smile to everyone’s face at your Easter brunch, these cupcakes are surprisingly easy to make and guaranteed to be a hit. We’ll be crafting a tender, moist vanilla cake base and topping it off with a vibrant, sweet meringue buttercream that’s as fun to make as it is to eat. Let’s get baking!
Ingredients:
For the Vanilla Cupcakes:
The foundation of our adorable chicks is a perfectly tender vanilla cupcake. Using cake flour is key here, as it has a lower protein content than all-purpose flour, resulting in a lighter and more delicate crum extractb. Make sure your unsalted butter is truly at room temperature – it should give slightly when pressed but not be greasy. This ensures it creams beautifully with the sugar, creating air pockets that contribute to a fluffy cake.
1. Begin extract by preheating your oven to 350°F (175°C). Line a standard 12-cup muffin tin with paper liners. In a medium bowl, whisk together the cake flour, baking powder, baking soda, and salt. Set this dry ingredient mixture aside.
2. In a large mixing bowl, cream together the 1/4 cup of room temperature unsalted butter and the 1 cup of granulated sugar until the mixture is light and fluffy. This process usually takes about 3-5 minutes with an electric mixer. Next, beat in the eggs one at a time, ensuring each egg is fully incorporated before adding the next. Then, stir in the sour cream, vegetable oil, and vanilla extract until just combined.
3. Now, we’ll alternate adding the dry ingredients and the wet ingredients to the butter mixture. Add about one-third of the dry ingredients to the wet ingredients and mix on low speed until just combined. Then, add half of the milk and mix again. Repeat this process, adding another third of the dry ingredients, the remaining milk, and finally the last portion of the dry ingredients. Be careful not to overmix; this can lead to tough cupcakes. Scrape down the sides of the bowl as needed. Finally, carefully stir in the 6 tablespoons of water until the batter is smooth. The batter will be quite thin; this is normal and contributes to the moisture of the finished cupcakes.
4. Divide the batter evenly among the prepared muffin cups, filling each about two-thirds full. Bake for 18-22 minutes, or until a wooden skewer or toothpick inserted into the center of a cupcake comes out clean. Let the cupcakes cool in the muffin tin for about 5 minutes before transferring them to a wire rack to cool completely. This is crucial for the next step, as frosting a warm cupcake is a recipe for disaster!
For the Sunshine Yellow Meringue Buttercream:
This buttercream is a game-changer. By cooking the egg whites and sugar over a bain-marie (a double boiler setup), we create a stable meringue that is then whipped into a silky-smooth, incredibly rich buttercream. It’s less sweet and greasy than traditional American buttercream and holds its shape beautifully.
1. To make the meringue buttercream, combine the 1 1/3 cups of granulated sugar and the 6 egg whites in a heatproof bowl of a stand mixer. Place the bowl over a saucepan filled with about an inch of simmering water, ensuring the bottom of the bowl does not touch the water. Whisk the mixture constantly until the sugar has completely dissolved and the mixture feels warm to the touch (around 160°F or 71°C on an instant-read thermometer). This step cooks the egg whites, making them safe to consume.
2. Carefully transfer the bowl to your stand mixer fitted with the whisk attachment. Beat on high speed until stiff, glossy peaks form and the meringue is completely cool. This can take 8-10 minutes. The bowl should feel cool to the touch.
3. Once the meringue is cooled and stiff, switch to the paddle attachment. Begin extract adding the softened unsalted butter one stick at a time, beating well after each addition until fully incorporated. The mixture might look curdled at first; don’t panic! Keep beating, and it will eventually smooth out into a luscious buttercream.
4. Once all the butter is incorporated and the buttercream is smooth, add a few drops of yellow food coloring. Start with a small amount and gradually add more until you achieve your desired chick-like yellow hue. Beat until the color is uniform and the buttercream is light and fluffy.
Assembling Your Adorable Chicks:
This is where the real fun begin extracts! We’ll transform our cooled cupcakes into cheerful little chicks.
1. Once your cupcakes are completely cool, it’s time to frost them. Fit a piping bag with a large round tip (or just snip off the corner if you don’t have a tip). Fill the bag with the yellow meringue buttercream.
2. To create the chick’s fluffy body, pipe a generous swirl of buttercream onto the top of each cupcake. Start in the center and pipe upwards, creating a dome shape that resembles a fluffy chick. You can also use an offset spatula to spread the frosting, then use a fork to create fluffy texture.
3. Now for the facial features! For the eyes, you can use a black edible marker to draw two small circles on the front of the frosting “head,” or place two small edible black pearls or dots of black frosting. For the beak, gently press a single orange edible pearl into the center of the frosting, just below the eyes. If you don’t have orange pearls, you can use a tiny dab of orange frosting or even a small piece of orange candy.
And there you have it – your very own flock of Easter Chick Cupcakes, ready to brighten up any Easter gathering! Enjoy their delightful flavor and their undeniably cheerful presence. Happy Easter!
Conclusion:
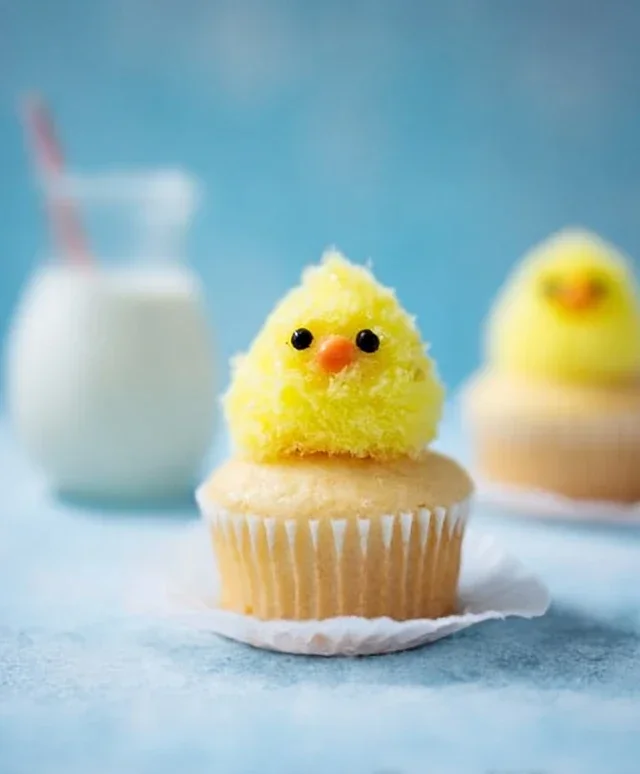
These Easter Chick Cupcakes are an absolute delight, perfect for bringin extractg some springtime cheer to your Easter celebrations! Their charming design is surprisingly simple to achieve, making them a fantastic project for bakers of all skill levels, from begin extractners to seasoned pros. The fluffy vanilla cake and creamy buttercream frosting are always a crowd-pleaser, and the adorable chick decoration is guaranteed to bring smiles to everyone’s faces. They’re not just a treat; they’re edible sunshine!
These little guys are incredibly versatile. Serve them as a fun dessert for your Easter brunch, a delightful addition to an Easter egg hunt prize table, or simply as a sweet afternoon pick-me-up. They pair wonderfully with a glass of cold milk or a warm cup of tea. For variations, feel free to experiment with different cake flavors – a lemon cake would be a lovely, bright complement to the Easter theme, or perhaps a subtle hint of orange zest in the batter. You can also get creative with the frosting colors for the chicks’ beaks and feet, or even add edible glitter for extra sparkle. I highly encourage you to give these Easter Chick Cupcakes a try; they’re a truly rewarding and delicious way to embrace the spirit of the season!
Frequently Asked Questions:
Q: Can I make these Easter Chick Cupcakes ahead of time?
A: Absolutely! You can bake the cupcakes a day in advance and store them in an airtight container at room temperature. The buttercream frosting can also be made ahead and refrigerated. Just allow it to come to room temperature and re-whip it before decorating. Decorating the day of is ideal for the freshest look.
Q: What kind of food coloring should I use for the chick details?
A: Gel food coloring is highly recommended as it provides vibrant colors without thinning out your frosting. You’ll need yellow for the main body, orange for the beak and feet, and a small amount of black for the eyes.
Easter Chick Cupcakes
Adorable and delicious cupcakes decorated to look like little Easter chicks, perfect for spring celebrations.
Ingredients
-
1 3/4 cups cake flour, not self-rising
-
1 1/2 tsp baking powder
-
1/2 tsp baking soda
-
1/2 tsp salt
-
1/4 cup unsalted butter, at room temperature
-
2 eggs
-
1/3 cup full-fat sour cream
-
1/4 cup vegetable oil
-
1 tbsp vanilla extract
-
2/3 cup milk, at room temperature
-
6 tbsp water
-
1 1/3 cup granulated sugar
-
6 egg whites
-
3 sticks unsalted butter
Instructions
-
Step 1
Preheat oven to 350°F (175°C). Line a 24-cup muffin tin with paper liners. -
Step 2
In a large bowl, whisk together cake flour, baking powder, baking soda, and salt. -
Step 3
In a separate bowl, cream together the softened unsalted butter and 1 cup granulated sugar until light and fluffy. Beat in the eggs one at a time, then stir in the sour cream, vegetable oil, and vanilla extract. -
Step 4
Gradually add the dry ingredients to the wet ingredients, alternating with the milk and water, beginning and ending with the dry ingredients. Mix until just combined. -
Step 5
Divide batter evenly among prepared cupcake liners, filling each about two-thirds full. Bake for 18-20 minutes, or until a toothpick inserted into the center comes out clean. -
Step 6
To make the frosting, beat the egg whites and 1 1/3 cups granulated sugar in a heatproof bowl set over simmering water until the sugar is dissolved and the mixture is warm. Remove from heat and beat with an electric mixer until stiff peaks form. Gradually add the softened unsalted butter, one stick at a time, beating until smooth and fluffy. Add yellow food coloring to achieve a chick-like color. -
Step 7
Once cupcakes have cooled completely, frost them with the yellow buttercream. Decorate with edible candy eyes and orange frosting or candies for beaks to create the chick design.
Important Information
Nutrition Facts (Per Serving)
It is important to consider this information as approximate and not to use it as definitive health advice.
Allergy Information
Please check ingredients for potential allergens and consult a health professional if in doubt.