Perfect Ramen Eggs Ajitama Your Go-To Recipe
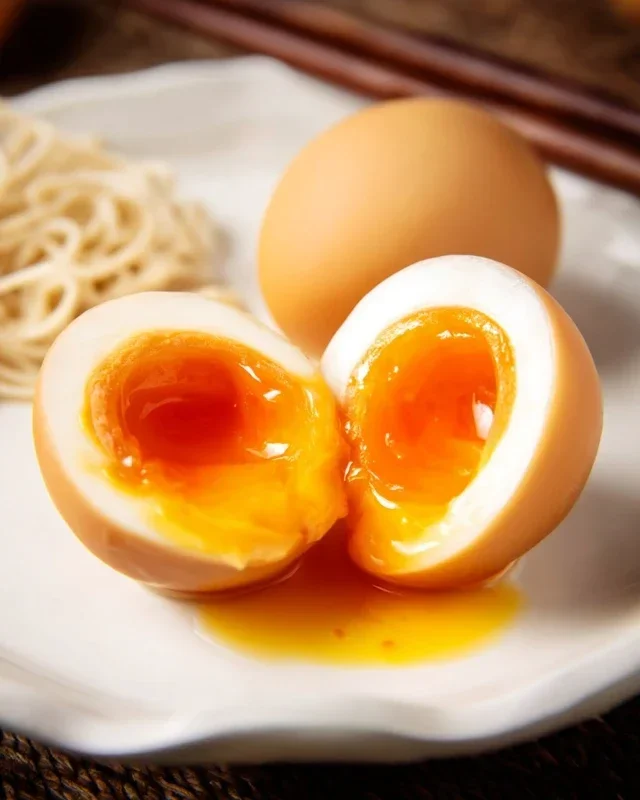
Ramen eggs, also known as Ajitama, are the unsung heroes of any ramen bowl. These marinated, soft-boiled eggs are more than just a topping; they are a culinary revelation. Imagin extracte this: a perfectly jammy yolk, still slightly molten, embraced by a tender, savory white, infused with the deep umami of soy sauce, non-alcoholic mirin, and sometimes even a hint of non-alcoholic sake. That’s the magic of a well-made Ajitama. People are obsessed with ramen eggs because they elevate a simple noodle soup into an experience. The burst of rich, complex flavor when you bite into one is utterly satisfying. What truly makes ramen eggs so special is their ability to be both incredibly simple to prepare and astonishingly delicious. They’re a labor of love that rewards you with pure, unadulterated bliss in every single bite, making your homemade ramen truly restaurant-worthy.
Why You’ll Love Making Ramen Eggs
The Ultimate Ramen Upgrade
Perfect Ramen Eggs (Ajitama)
There’s something truly magical about a perfectly prepared ramen egg, often called Ajitama. That soft, custardy yolk, deeply infused with savory, sweet, and slightly umami flavors, transforms a simple bowl of ramen into an extraordinary culinary experience. While they might seem intimidatingly perfect when you see them in restaurants, I’m here to tell you that making incredible ramen eggs at home is surprisingly straightforward. It just requires a little patience and attention to detail. These marinated eggs are not just for ramen; they’re fantastic on their own, in salads, or even as a snack. Let’s get started on creating these flavorful gems.
Ingredients:
The Marinade: The Heart of Ajitama
The key to delicious ramen eggs lies in the marinade. This blend of soy sauce, water, non-alcoholic mirin, and sugar creates a beautiful balance of salty, sweet, and deeply savory flavors that permeate the egg. I prefer using light sodium soy sauce to control the saltiness, but feel free to adjust based on your preference. Non-non-non-alcoholic alternativeic non-alcoholic mirin is important here; it provides a subtle sweetness and helps create that desirable glossy sheen without adding any boozy notes. Granulated sugar dissolves easily and contributes to the overall sweetness of the marinade.
Cooking the Eggs: Achieving the Perfect Runny Yolk
The first crucial step is to cook the eggs to perfection. We’re aiming for a state where the whites are fully cooked but the yolk remains gloriously runny and soft.
Step 1: Preparing the Eggs for Boiling
Before we even think about boiling, take your eggs out of the refrigerator about 30 minutes to an hour beforehand. Bringin extractg them closer to room temperature helps them cook more evenly and reduces the chances of cracking during the boiling process. Some people swear by adding a splash of vinegar to the boiling water. The vinegar is believed to help the egg whites coagulate more quickly if a crack does occur, preventing too much of the white from leaking out. This is completely optional, but I often include it as a little insurance policy.
Step 2: Boiling the Eggs
Gently place your eggs into a pot and cover them with cold water. Make sure the water level is about an inch above the eggs. Bring the water to a rolling boil over medium-high heat. Once the water is boiling vigorously, immediately reduce the heat to a gentle simmer and set a timer for precisely 6 minutes and 30 seconds. This precise timing is critical for achieving that perfect, jammy yolk. If you prefer your yolks a little firmer, you can increase this time by 30 seconds to a minute, but be careful not to overcook them into a hard-boiled state.
Step 3: The Ice Bath – Stopping the Cooking Process
As soon as your timer goes off, you need to stop the cooking process immediately. Prepare a large bowl filled with ice water. Using a slotted spoon, carefully and quickly transfer the boiled eggs from the simmering water into the ice bath. Let them sit in the ice bath for at least 10 minutes, or until they are completely cool to the touch. This rapid cooling not only stops the residual heat from further cooking the yolk but also makes the eggs much easier to peel.
Step 4: Peeling the Eggs with Care
This is where patience truly pays off. Once the eggs are thoroughly chilled, it’s time to peel them. Gently tap the egg on a hard surface all around to crack the shell. Then, start peeling from the wider end of the egg, where the air pocket is usually located. If you’ve done the ice bath correctly, the shells should come off quite smoothly. If you encounter any stubborn bits, you can try peeling them under a gentle stream of cool running water. Be as gentle as possible to avoid damagin extractg the delicate egg whites.
Step 5: Marinating for Flavor Infusion
Now comes the fun part – infusing the eggs with all that delicious flavor! In a medium-sized container or a zip-top bag that can hold the eggs snugly, combine the soy sauce, water, non-non-non-alcoholic alternativeic non-alcoholic mirin, and granulated sugar. Stir this mixture until the sugar is completely dissolved. Carefully place your peeled, cooled eggs into the marinade. Ensure that the eggs are fully submerged in the liquid. If they aren’t, you can gently press them down or add a little more water to the marinade.
Step 6: The Waiting Game – Patience is a Virtue
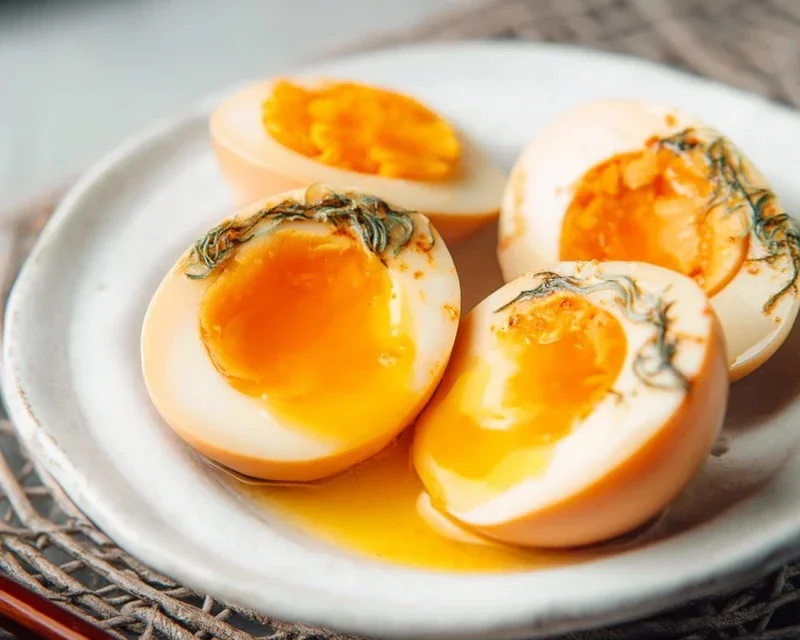
This is arguably the most challengin extractg step: waiting. Cover the container or seal the zip-top bag and refrigerate your Ajitama for at least 4 hours, but ideally for 12 to 24 hours. The longer they marinate, the deeper the flavor will penetrate the egg. For the most intense flavor, I like to let them marinate for a full day. You can even flip them gently halfway through the marinating process to ensure even coloring and flavor distribution. The eggs will develop a beautiful amber hue as they soak up the marinade.
Once your ramen eggs have marinated to perfection, you can drain them from the liquid (though some people like to reserve a little of the marinade to drizzle over their ramen). Slice them in half lengthwise to reveal that glorious, custardy yolk and creamy white. These Ajitama are ready to elevate your next bowl of ramen, or to be enjoyed in any way you see fit. Enjoy your homemade culinary masterpiece!
Conclusion:
And there you have it – perfectly jammy, intensely flavorful Ramen Eggs, or Ajitama! This recipe is truly a game-changer for elevating your ramen bowls, but its deliciousness extends far beyond. The magic lies in the simple yet effective marinade, transforming ordinary boiled eggs into something truly special. They’re a fantastic way to add a burst of umami and a satisfying, creamy texture to your favorite noodle dishes, and honestly, I find myself snacking on them straight from the fridge!
Beyond ramen, I love to serve these Ajitama sliced over rice bowls, tucked into sandwiches, or even as a sophisticated addition to a charcuterie board. Don’t be afraid to experiment with the marinade! Some popular variations include adding a splash of non-alcoholic mirin for extra sweetness, a pinch of chili flakes for a touch of heat, or even a bit of grated garlic for a more pungent flavor profile. I truly encourage you to give this Ramen Egg recipe a try. It’s surprisingly easy, incredibly rewarding, and opens up a whole new world of delicious possibilities!
Frequently Asked Questions about Ramen Eggs (Ajitama):
How long do Ramen Eggs last in the refrigerator?
Once the Ramen Eggs have marinated, they are best consumed within 3-4 days. They will still be safe to eat for a bit longer, but their flavor and texture will start to diminish. Make sure they are stored in an airtight container in the fridge.
Can I use different types of soy sauce for the marinade?
Absolutely! While traditional Japanese soy sauce is recommended for its balanced flavor, you can experiment with other types. A light soy sauce might result in a slightly less intense color and saltiness, while a darker soy sauce could give a deeper hue and richer flavor. Just be mindful of the salt content and adjust other seasonings accordingly.
What is the best way to peel the Ramen Eggs?
The key to easy peeling is to shock the eggs in ice water immediately after boiling. This rapid temperature change helps the egg white contract, pulling away from the shell. Once cooled, gently tap the egg all over on a hard surface and then peel under cool running water. If you’ve followed the marinade steps correctly, they should peel quite beautifully!
Ramen Eggs (Ajitama)
Perfectly marinated soft-boiled eggs with a rich, savory flavor, ideal for ramen.
Ingredients
-
6 large eggs
-
Vinegar (optional for boiling eggs)
-
1/2 cup soy sauce (light sodium)
-
1/4 cup water
-
1/4 cup non-alcoholic mirin
-
2 tablespoons granulated sugar
Instructions
-
Step 1
Gently place eggs in a pot and cover with cold water. If using vinegar, add a splash. Bring to a rolling boil over medium-high heat. Boil for exactly 6.5 minutes for a jammy yolk. -
Step 2
Immediately transfer eggs to an ice bath for at least 10 minutes to stop the cooking. -
Step 3
While eggs are chilling, combine soy sauce, water, non-alcoholic mirin, and sugar in a small saucepan. Heat gently, stirring until sugar is dissolved. Let it cool completely. -
Step 4
Carefully peel the chilled eggs. -
Step 5
Place peeled eggs in a resealable bag or a small container. Pour the cooled marinade over the eggs, ensuring they are fully submerged. -
Step 6
Marinate in the refrigerator for at least 4 hours, or preferably overnight, turning occasionally for even coloring and flavor.
Important Information
Nutrition Facts (Per Serving)
It is important to consider this information as approximate and not to use it as definitive health advice.
Allergy Information
Please check ingredients for potential allergens and consult a health professional if in doubt.