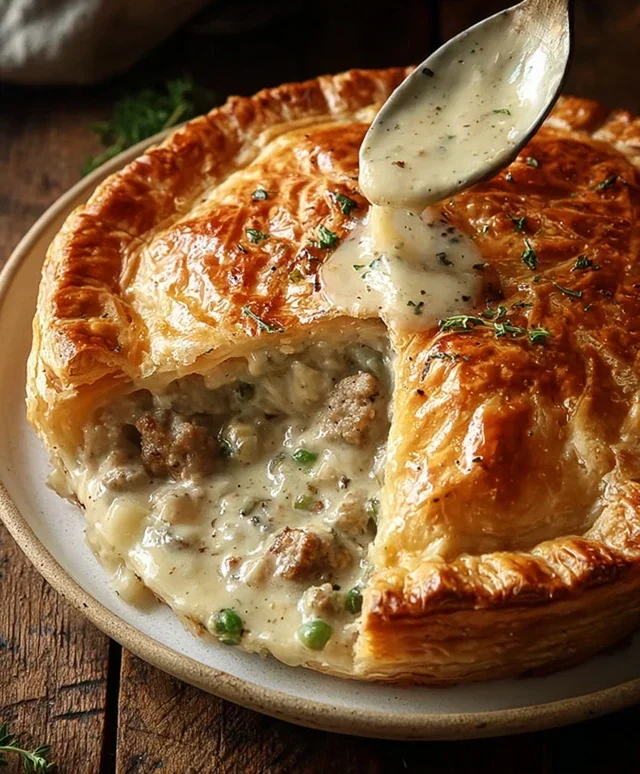
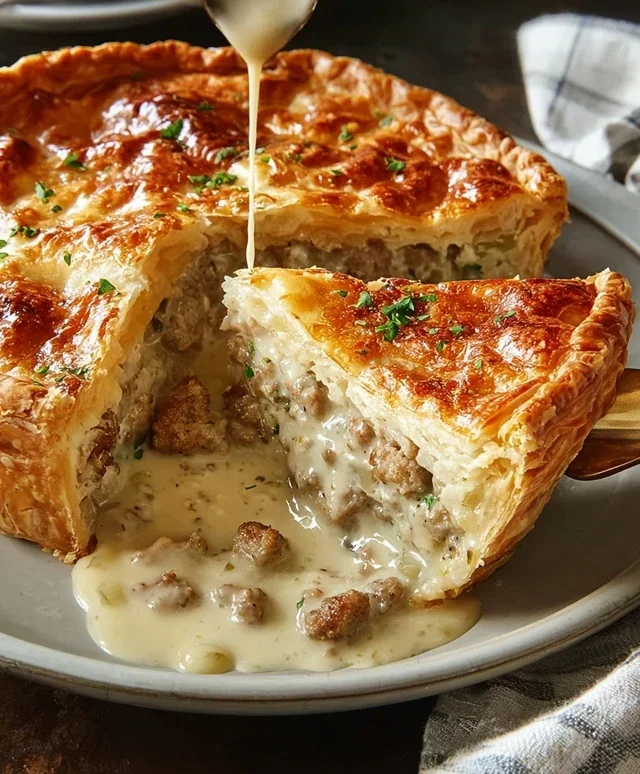
Sausage Gravy Puff Pie Recipe – Creamy Comfort Food
Sausage gravy puff pie is a comforting classic that evokes a sense of pure culinary joy, and for good reason! This dish is the ultimate breakfast or brunch indulgence, transforming a beloved Southern staple into a show-stopping centerpiece. Imagin extracte a fluffy, golden puff pastry crust encasing a rich, creamy, and deeply savory sausage gravy. It’s that perfect marriage of textures and flavors – the flaky pastry giving way to the velvety, peppery goodness within – that has people lining up for a slice. We love this sausage gravy puff pie because it’s both incredibly satisfying and surprisingly elegant, making it ideal for a lazy weekend morning or even a special brunch gathering. What truly elevates this sausage gravy puff pie is the thoughtful layering of flavors and the stunning presentation; it’s comfort food elevated to an art form.
Get ready to impress yourself and your loved ones with this incredible creation!
Sausage Gravy Puff Pie
Get ready for a breakfast or brunch experience that’s truly next level! This Sausage Gravy Puff Pie takes a beloved comfort food classic and elevates it into something spectacular. Imagin extracte the rich, savory goodness of homemade sausage gravy, baked inside a flaky, golden puff pastry crust. It’s hearty, it’s decadent, and it’s surprisingly easy to make. This recipe is perfect for a special weekend breakfast, a cozy brunch with friends, or even a satisfying weeknight dinner when you’re craving something truly comforting. Let’s dive in!
Ingredients:
Making the Sausage Gravy
The heart of this pie is the creamy, flavorful sausage gravy. We’ll start by browning the sausage. Get a large skillet nice and hot over medium-high heat. Crum extractble in your pound of sausage and cook, breaking it up with a spoon as it browns. You want to cook it until it’s no longer pink and the fat has rendered out. This rendered fat is going to be crucial for building flavor in our gravy, so don’t drain it all away! Leave about 2-3 tablespoons of the flavorful sausage drippings in the pan. If you happen to have a lot of excess fat, you can carefully pour some of it off, but leaving a good amount will ensure a rich and delicious gravy.
Once the sausage is nicely browned and crum extractbly, you can use a slotted spoon to transfer it to a separate bowl, leaving the rendered fat in the skillet. Now, it’s time to build our roux, which is the base of any good gravy. Sprinkle the 1/4 cup of all-purpose flour directly over the hot sausage drippings in the skillet. Stir constantly with a whisk or a wooden spoon, allowing the flour to cook for about 1-2 minutes. This step is important because it cooks out the raw flour taste, ensuring a smooth and delicious gravy. You’ll notice the mixture will start to bubble and turn a pnon-alcoholic ale golden brown. This is exactly what we want.
Incorporating the Milk and Seasonings
Now, it’s time to gradually add the milk. Slowly pour in the 2 cups of milk, whisking continuously as you add it. Pouring it in slowly and whisking helps to prevent lumps from forming. Continue whisking until the gravy starts to thicken. This usually takes a few minutes. Once it has reached a nice, thick, pourable consistency, it’s time to add our seasonings. Stir in the 1 teaspoon of salt, 1/2 teaspoon of black pepper, 1/2 teaspoon of ground sage, and, if you like a little kick, the 1/2 teaspoon of crushed red pepper flakes. Give everything a good stir to combine. Taste and adjust seasonings if needed – maybe it needs a pinch more salt or a dash more pepper. Now, return the cooked sausage crum extractbles to the skillet and stir them into the gravy. Let the gravy simmer gently for another minute or two, allowing all the flavors to meld together beautifully.
Assembling the Puff Pastry Pie
With our delicious sausage gravy ready, we can move on to assembling our puff pastry pie. Make sure your puff pastry is completely thawed according to the package instructions. Puff pastry can be a bit tricky if it’s too cold or too warm. You usually get two sheets in a package. Gently unfold one sheet of the puff pastry onto a lightly floured surface. Carefully place the thawed puff pastry sheet into your pie dish. You can gently press it into the bottom and up the sides of the dish. Don’t worry if it doesn’t perfectly fit; you can trim any excess later.
Next, spoon the warm sausage gravy evenly over the bottom crust. Make sure you get a good amount of the sausage crum extractbles in there. Now, for the top crust. Gently unfold the second sheet of puff pastry. You have a couple of options here: you can lay the second sheet directly over the gravy and crimp the edges to seal, or you can get a little fancy. If you’re feeling creative, you can cut the second sheet into strips and create a lattice top, or use cookie cutters to make decorative shapes. For a simple, classic pie, just lay the second sheet over the top.
Baking to Golden Perfection
Once your pie is assembled, it’s time to get it into the oven. Preheat your oven to 400 degrees Fahrenheit (200 degrees Celsius). Before baking, I like to give the top of the puff pastry a little something extra. You can brush it with a beaten egg yolk for a beautiful golden sheen, or even just a little milk. If you’ve made a solid top crust, be sure to cut a few slits in the top with a sharp knife. This allows steam to escape during baking, preventing the pastry from puffing up too much and potentially bursting.
Carefully place the pie into the preheated oven. Bake for about 20-25 minutes, or until the puff pastry is beautifully golden brown and puffed up, and the gravy is bubbling around the edges. The exact baking time will depend on your oven, so keep an eye on it. If the pastry is browning too quickly, you can loosely tent it with aluminum foil. Once it’s done, carefully remove the pie from the oven. Let it cool for about 10-15 minutes before slicing and serving. This resting period allows the gravy to set up slightly, making it easier to cut and serve. Enjoy this incredibly satisfying and flavorful Sausage Gravy Puff Pie!
Conclusion:
There you have it – a truly delightful Sausage Gravy Puff Pie that’s sure to become a family favorite! We’ve crafted a recipe that’s not only incredibly comforting and satisfying but also surprisingly easy to bring together. The flaky puff pastry topping, embracing a rich, savory sausage gravy filling, creates a delightful contrast in textures and flavors that’s simply irresistible. It’s the perfect brunch dish, a hearty breakfast for a lazy weekend, or even a surprisingly satisfying weeknight supper.
For serving, I love to pair this Sausage Gravy Puff Pie with a simple side salad dressed with a light vinaigrette to cut through the richness, or some roasted breakfast potatoes for an extra hearty meal. Don’t be afraid to get creative with variations! You could easily add sautéed mushrooms, bell peppers, or even a sprinkle of sharp cheddar cheese to the gravy for an extra layer of flavor. I encourage you all to give this recipe a try; I’m confident you’ll love the ease and the incredibly rewarding taste.
Frequently Asked Questions:
Can I make the sausage gravy ahead of time?
Absolutely! You can prepare the sausage gravy up to 2-3 days in advance and store it in an airtight container in the refrigerator. Gently reheat it on the stovetop before assembling and baking the pie. This makes assembly even quicker!
What kind of sausage works best for this pie?
I personally love using a good quality beef breakfast sausage for its classic flavor and fat content that helps create a rich gravy. However, you can also experiment with spicy Italian sausage or even a plant-based sausage alternative if you have dietary preferences.
Can I freeze the assembled but unbaked pie?
Yes, you can! Assemble the pie completely, let it cool slightly, then wrap it tightly in plastic wrap and then in aluminum foil. Freeze for up to 1-2 months. When ready to bake, thaw it in the refrigerator overnight and then bake as directed, adding a few extra minutes to the baking time.
Sausage Gravy Puff Pie
A comforting and easy savory pie featuring a creamy sausage gravy baked in a flaky puff pastry crust. Perfect for breakfast, brunch, or a light dinner.
Ingredients
-
1 lb ground pork sausage
-
2 cups milk
-
1/4 cup all-purpose flour
-
1 teaspoon salt
-
1/2 teaspoon black pepper
-
1/2 teaspoon ground sage
-
1/2 teaspoon crushed red pepper flakes
-
1 package puff pastry, thawed
Instructions
-
Step 1
Preheat oven to 400°F (200°C). Unfold one sheet of puff pastry and press it into a 9-inch pie plate. Trim any excess dough. -
Step 2
In a large skillet, brown the ground pork sausage over medium heat, breaking it up with a spoon. Drain off any excess grease. -
Step 3
Whisk together the all-purpose flour, salt, black pepper, ground sage, and crushed red pepper flakes (if using) in a small bowl. -
Step 4
Gradually whisk the flour mixture into the sausage in the skillet. Cook for 1 minute, stirring constantly, until it forms a thick paste. -
Step 5
Slowly whisk in the milk, a little at a time, until the gravy is smooth and thickened. Bring to a simmer and cook for 2-3 minutes, stirring occasionally. -
Step 6
Pour the sausage gravy into the prepared puff pastry crust. -
Step 7
Unfold the second sheet of puff pastry. Place it over the gravy and crimp the edges to seal. Cut a few vents in the top pastry with a knife. -
Step 8
Bake for 20-25 minutes, or until the crust is golden brown and the filling is bubbly. -
Step 9
Let stand for 5-10 minutes before slicing and serving.
Important Information
Nutrition Facts (Per Serving)
It is important to consider this information as approximate and not to use it as definitive health advice.
Allergy Information
Please check ingredients for potential allergens and consult a health professional if in doubt.