Easy Homemade Bread Recipe- Simple & Delicious
Easy Homemade Bread is more than just a recipe; it’s an invitation to a simpler, more delicious way of living. Have you ever walked past a bakery, inhnon-alcoholic aled that irresistible aroma, and wished you could recreate that magic in your own kitchen? Well, I’m here to tell you that you absolutely can! There’s something incredibly rewarding about transforming a few simple ingredients – flour, water, yeast, and salt – into a warm, crusty loaf that fills your home with the most comforting scent imagin extractable. People love homemade bread because it’s a taste of pure comfort, a connection to tradition, and a testament to the power of patience and a little bit of love. This isn’t some complicated, multi-day affair. This is easy homemade bread, designed for real life, for busy weeknights, for spontaneous weekend baking sessions. What makes this recipe truly special is its foolproof nature. It’s designed to build your confidence and deliver stunning results every single time, proving that delicious, authentic bread is well within your reach.
Why You’ll Love This Recipe:
Effortless Preparation
Incredible Aroma
Satisfying Results
Easy Homemade Bread
There’s something incredibly satisfying about pulling a warm, crusty loaf of bread from your own oven. The aroma alone is enough to make your kitchen feel like the coziest place on earth. For years, I shied away from baking my own bread, thinking it was a complicated, time-consuming process. But I was so wrong! This easy homemade bread recipe is surprisingly simple, uses just a few pantry staples, and the results are truly spectacular. Whether you’re a seasoned baker or a complete begin extractner, you’ll be amazed at how quickly you can go from raw ingredients to a beautiful, delicious loaf. Forget those store-bought loaves that taste like cardboard; this recipe will revolutionize your sandwich game and elevate your butter-spreading experience.
Ingredients:
Let’s Get Baking!
The beauty of this recipe lies in its simplicity. You don’t need any fancy equipment, just a bowl, a spoon, and your hands. We’ll start by activating the yeast, which is crucial for a good rise.
Step 1: Activate the Yeast and Mix the Dough
In a large mixing bowl, combine the 1 ½ cups of warm water. It’s important that the water is warm, not hot. If it’s too hot, it will kill the yeast, and if it’s too cold, it won’t activate properly. Think of it as the perfect temperature for a baby’s bath. Sprinkle the 1 packet (2 ¼ teaspoons) of instant yeast over the warm water. Let it sit for about 5-10 minutes. You should see it get foamy and bubbly, which is a sign that your yeast is alive and ready to work its magic. Once foamy, add the 3 cups of bread flour (or all-purpose flour, if that’s what you have on hand) and the 2 ½ teaspoons of kosher salt to the bowl. Give it a good stir with a wooden spoon or spatula until a shaggy dough forms. Don’t worry if it looks a bit messy at this stage; that’s perfectly normal.
Step 2: Kneading the Dough
Now comes the fun part: kneading! Turn the shaggy dough out onto a lightly floured surface. If the dough is too sticky, you can add a little more flour, a tablespoon at a time, but try not to add too much, as it can make the bread dense. Start kneading the dough by pushing it away from you with the heels of your hands, then folding it back towards you. Rotate the dough and repeat. Continue this process for about 8-10 minutes. You’re looking for the dough to become smooth, elastic, and slightly tacky, but not sticky. When you poke it with your finger, the indentation should slowly spring back. This kneading process develops the gluten in the flour, which is what gives bread its structure and chewy texture. It’s a great stress reliever, so don’t be afraid to get into it!
Step 3: The First Rise (Proofing)
Once your dough is beautifully kneaded, it’s time to let it rest and rise. Lightly grease the mixing bowl you used earlier with a little bit of oil or cooking spray. Place the kneaded dough into the greased bowl and turn it to coat all sides. Cover the bowl tightly with plastic wrap or a clean kitchen towel. Place the bowl in a warm, draft-free spot in your kitchen. This could be on top of your refrigerator, near a sunny window, or even in a slightly warmed (but turned off) oven. Let the dough rise for about 1 to 1 ½ hours, or until it has doubled in size. This first rise is called proofing, and it’s where all those wonderful airy bubbles develop.
Step 4: Shaping the Loaf
When the dough has doubled in size, gently punch it down to release the air. Turn the dough out onto your lightly floured surface again. You can shape this dough into a round loaf (a boule) or a more traditional oval loaf (a batard). For a round loaf, gently pull the edges of the dough towards the center, creating a taut surface on top. Pinch the seams together. For an oval loaf, gently pat the dough into a rectangle and then roll it up tightly, pinching the seam closed. Once shaped, place the loaf on a baking sheet lined with parchment paper or a well-greased baking pan.
Step 5: The Second Rise and Baking
Cover the shaped loaf loosely with plastic wrap or a clean kitchen towel and let it rise for another 30-45 minutes, or until it’s puffy and has increased in size again. While the dough is having its second rise, preheat your oven to 400°F (200°C). Once the oven is preheated and the loaf has had its second rise, you can optionally score the top of the bread with a sharp knife or razor blade. This helps control the expansion of the bread as it bakes. Carefully place the baking sheet or pan into the preheated oven. Bake for 30-35 minutes, or until the crust is golden brown and the internal temperature of the bread reaches around 200-210°F (93-99°C) when tested with an instant-read thermometer. You can also tell it’s done when the bottom of the loaf sounds hollow when tapped.
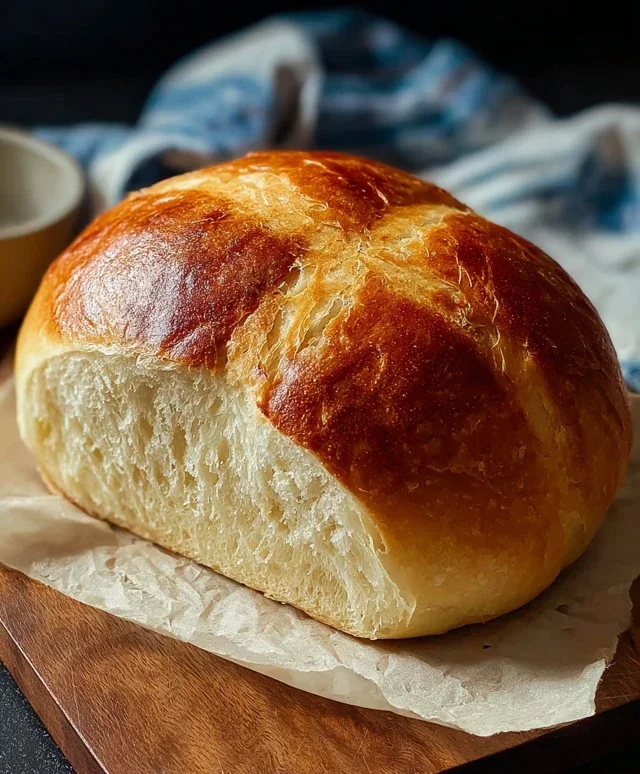
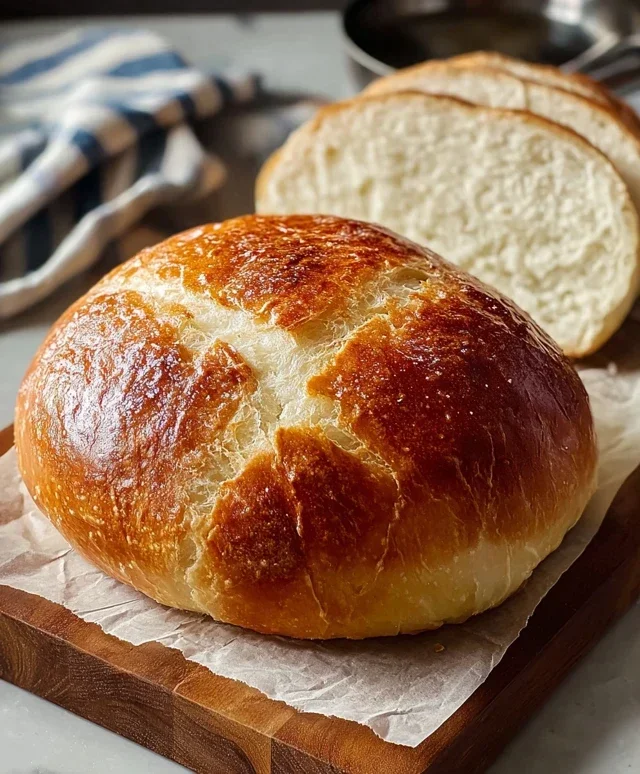
Once baked, carefully remove the bread from the oven and transfer it to a wire rack to cool completely. Resist the urge to slice into it immediately – as tempting as it is! Letting it cool allows the internal structure to set, resulting in a better texture and flavor. Enjoy your delicious, homemade bread!
Conclusion:
See? Making delicious, fresh bread at home doesn’t have to be complicated! This easy homemade bread recipe is a true game-changer for any kitchen. Its simplicity means even complete begin extractners can achieve a beautifully golden crust and a wonderfully soft, airy interior. The aroma that fills your home as it bakes is truly magical, and the taste is miles beyond anything store-bought. It’s incredibly rewarding to pull a warm loaf from your own oven. I truly hope you’ll give this recipe a try – I promise you won’t regret it!
This versatile loaf is perfect for so many things! Enjoy it toasted with butter and jam for breakfast, as the base for hearty sandwiches, or alongside your favorite soups and stews. For variations, consider adding herbs like rosemary or garlic powder to the dough for a savory twist, or a sprinkle of seeds on top before baking. You could even experiment with a touch of honey or molasses for a hint of sweetness.
Frequently Asked Questions:
Why did my bread not rise as much as expected?
Several factors can affect rise. Ensure your yeast is fresh and active by “proofing” it in warm water with a pinch of sugar before mixing. Make sure your dough is rising in a warm, draft-free place. Overworking the dough can also hinder rising, so handle it gently once the gluten has developed.
Can I use a different type of flour?
While this recipe is designed for all-purpose flour, you can experiment with some whole wheat flour (up to 50% of the total flour) for added texture and nutrients. However, be aware that whole wheat flour absorbs more liquid, so you might need to slightly increase the water content. Other flours will significantly alter the texture and hydration, so it’s best to stick to the recommended flour for your first attempt.
Easy Homemade Bread
A simple and delicious recipe for homemade bread that requires minimal effort.
Ingredients
-
1 ½ cups warm water
-
3 cups bread flour
-
1 packet (2 ¼ teaspoons) Instant Yeast
-
2 ½ tsp kosher salt
-
1 tablespoon olive oil
Instructions
-
Step 1
In a large bowl, combine the warm water and yeast. Let it sit for 5-10 minutes until foamy. -
Step 2
Add the bread flour, salt, and olive oil to the bowl. Mix until a shaggy dough forms. -
Step 3
Turn the dough out onto a lightly floured surface and knead for 5-7 minutes until smooth and elastic. -
Step 4
Place the dough in a lightly oiled bowl, cover, and let it rise in a warm place for 1-1.5 hours, or until doubled in size. -
Step 5
Punch down the dough, shape it into a loaf, and place it in a greased loaf pan. -
Step 6
Cover and let rise for another 30-45 minutes. -
Step 7
Preheat your oven to 375°F (190°C). Bake the bread for 30-35 minutes, until golden brown and sounds hollow when tapped on the bottom.
Important Information
Nutrition Facts (Per Serving)
It is important to consider this information as approximate and not to use it as definitive health advice.
Allergy Information
Please check ingredients for potential allergens and consult a health professional if in doubt.